- Welcome emails
- Drip campaigns
- Payment recovery
- Abandoned cart
- Trial expiration
{{{RESEND_UNSUBSCRIBE_URL}}} for compliance with non-transactional product and marketing messaging. See Unsubscribe behavior for how to add it to a Send Email step, or read more about when to use an unsubscribe link.
How it works
To start executing an Automation, you need to:1
Create Automation
Outline the sequence of steps to be executed.
2
Add Trigger
Define the event name that will trigger the Automation.
3
Define Steps
Configure the steps to be executed.
4
Send an Event
Trigger the Automation by sending an event from your application.
5
Monitor Runs
Track and debug your Automation executions using runs.
Create an Automation
- Using the dashboard
- Using the API
1
Create Automation
The Automations page shows all existing automations. You can search by name and filter by status (All Statuses, Enabled, or Disabled) to quickly find the automation you need.Click Create automation to start a new Automation.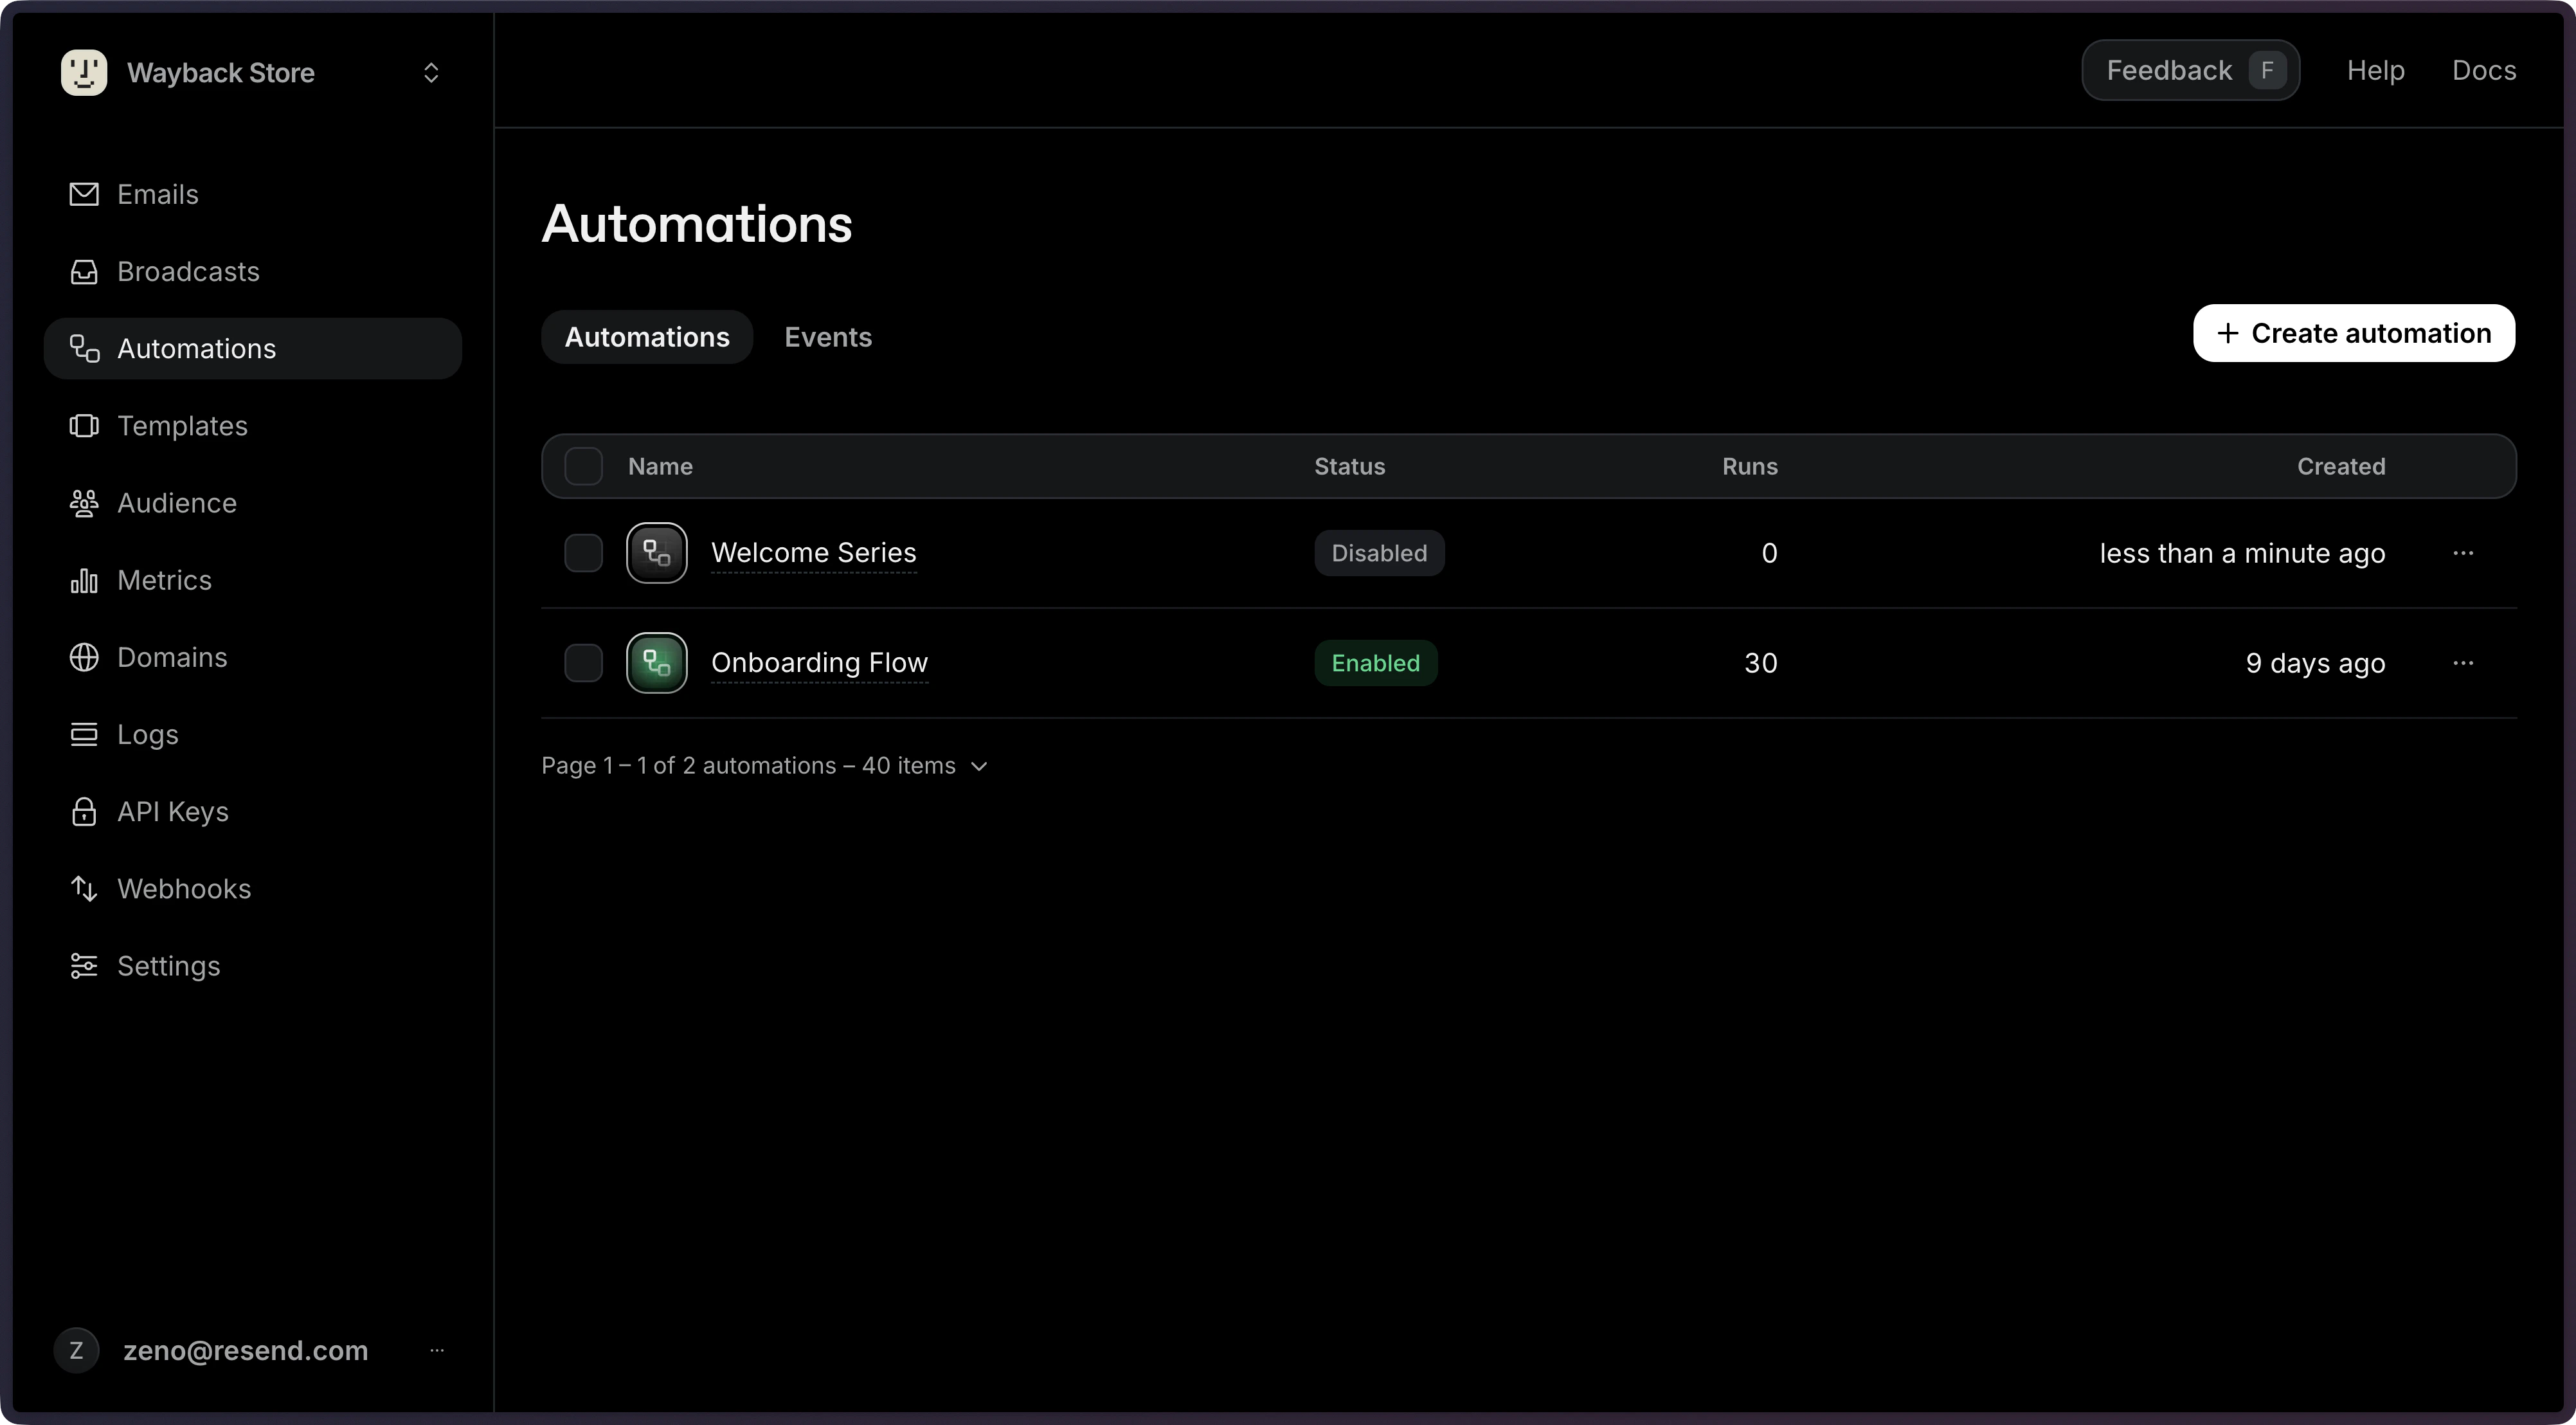
2
Add Trigger
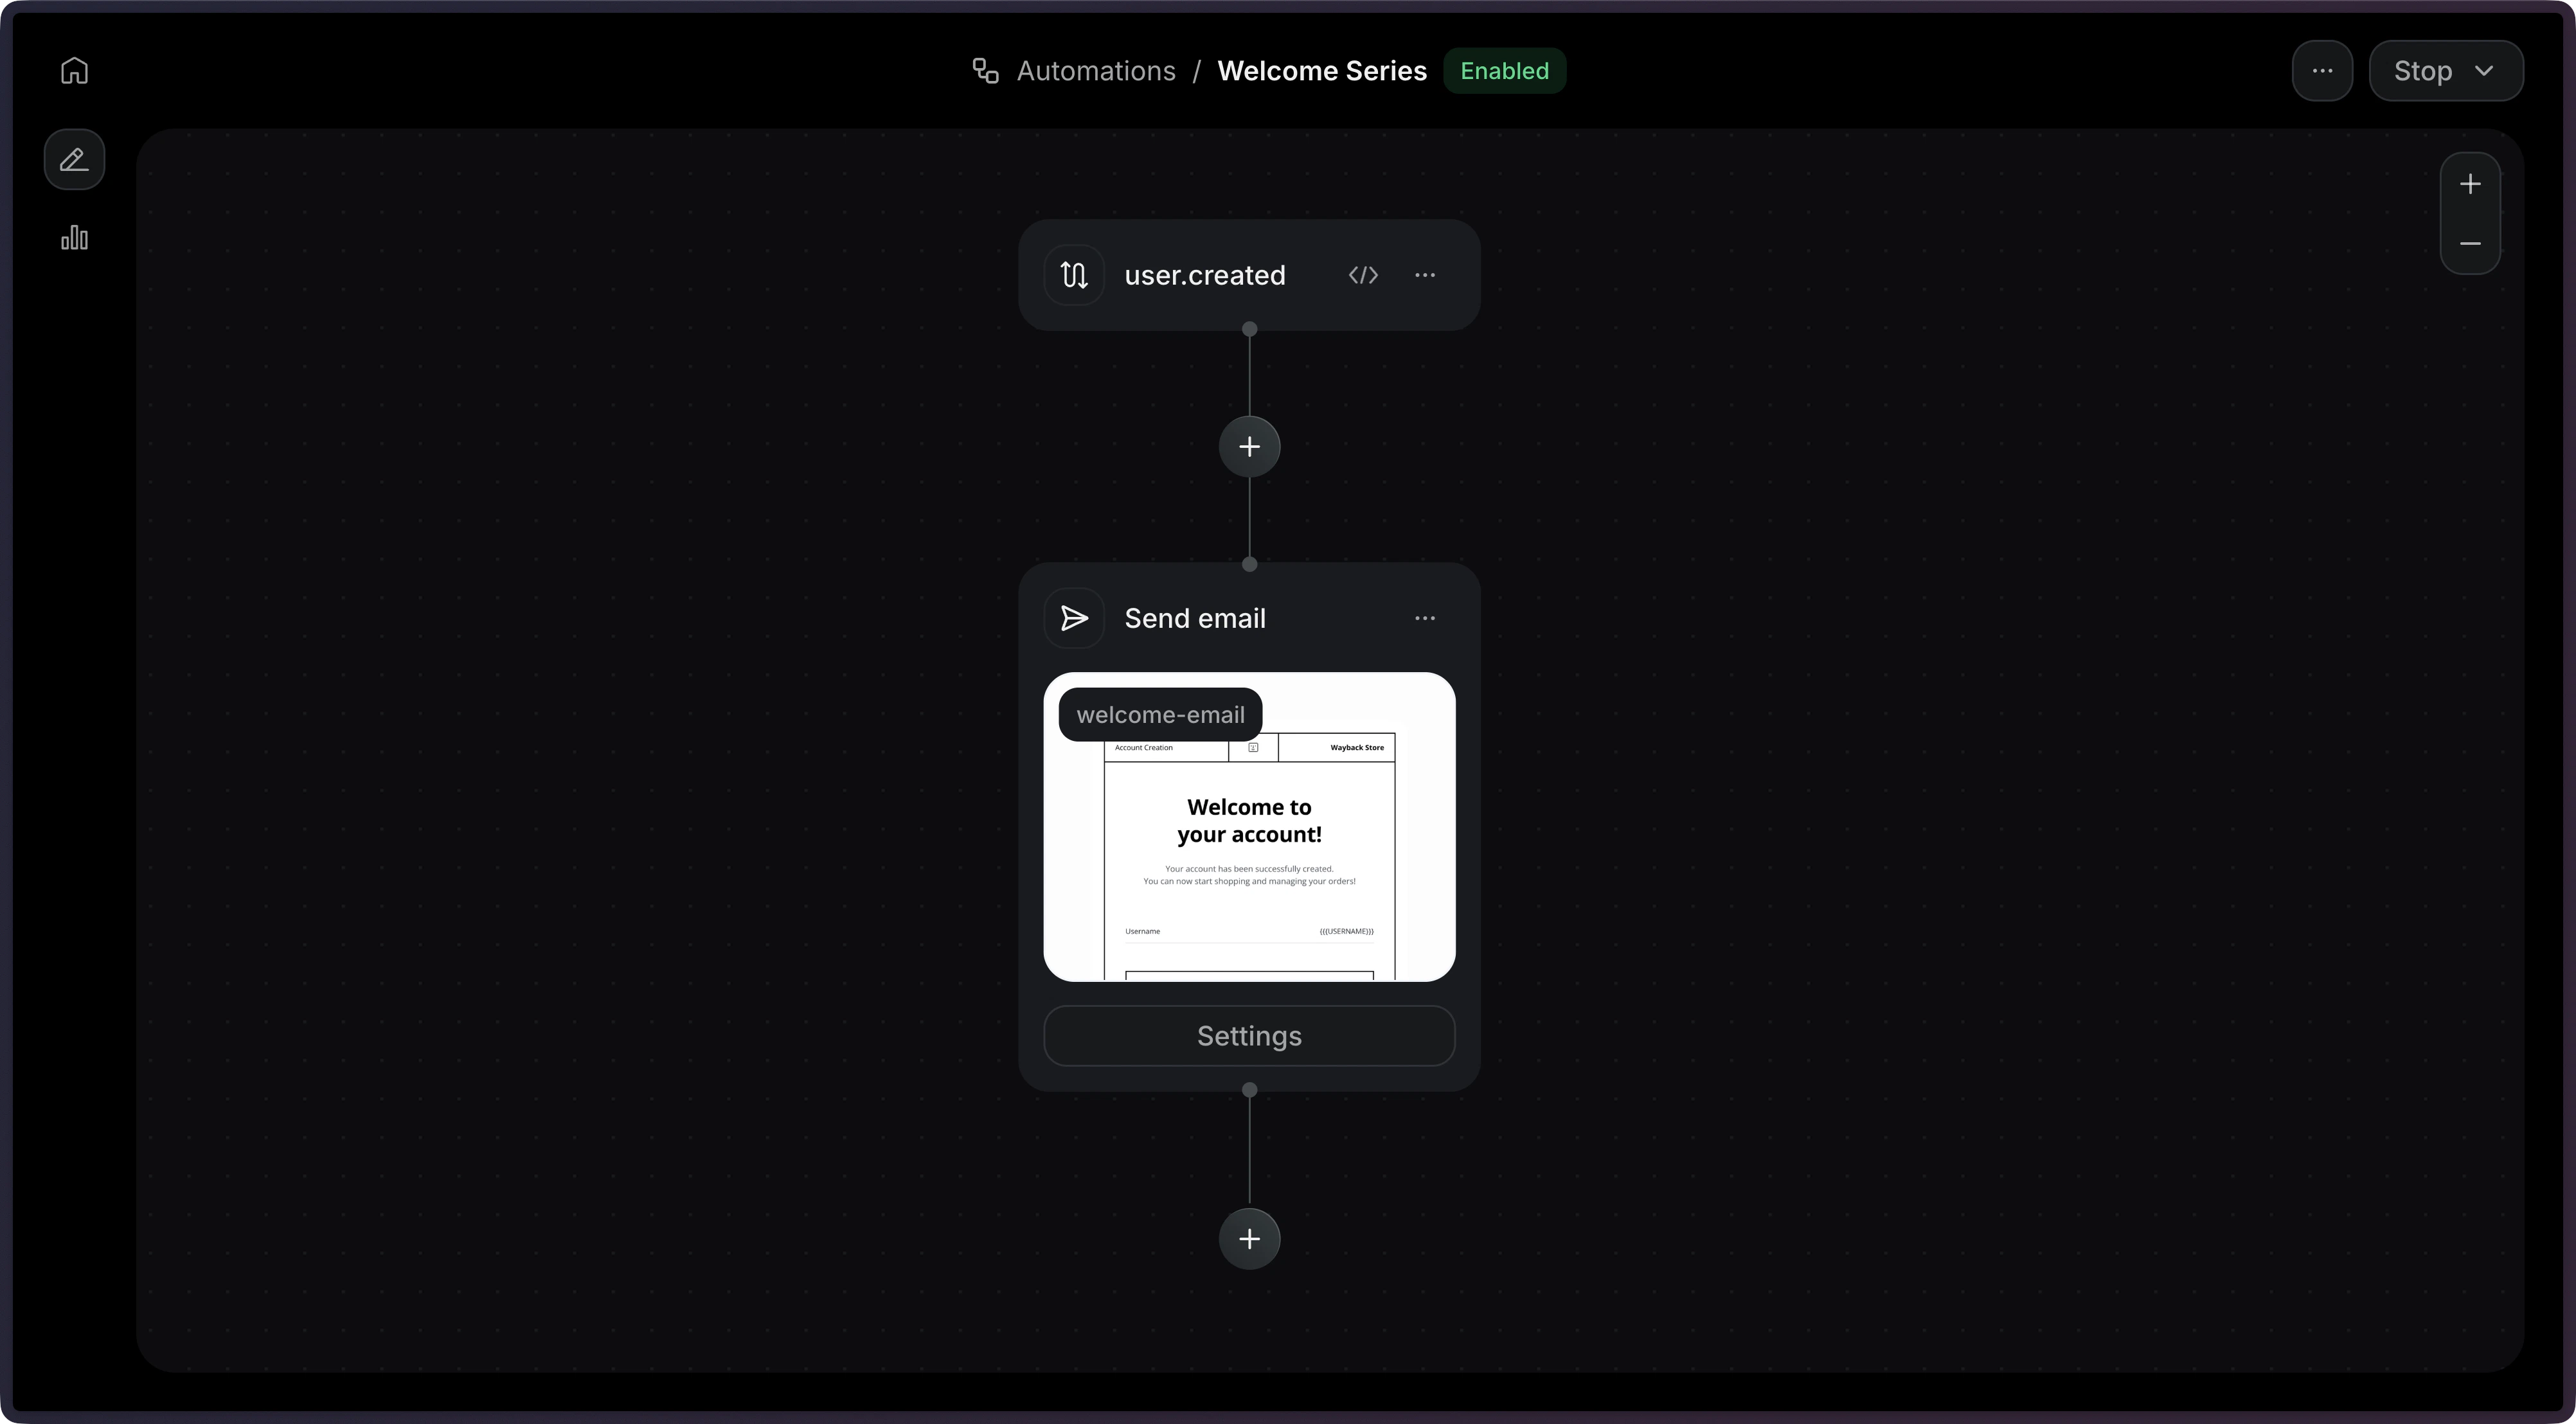
A trigger is the first step that will run when the Automation is executed. You can use a custom event like 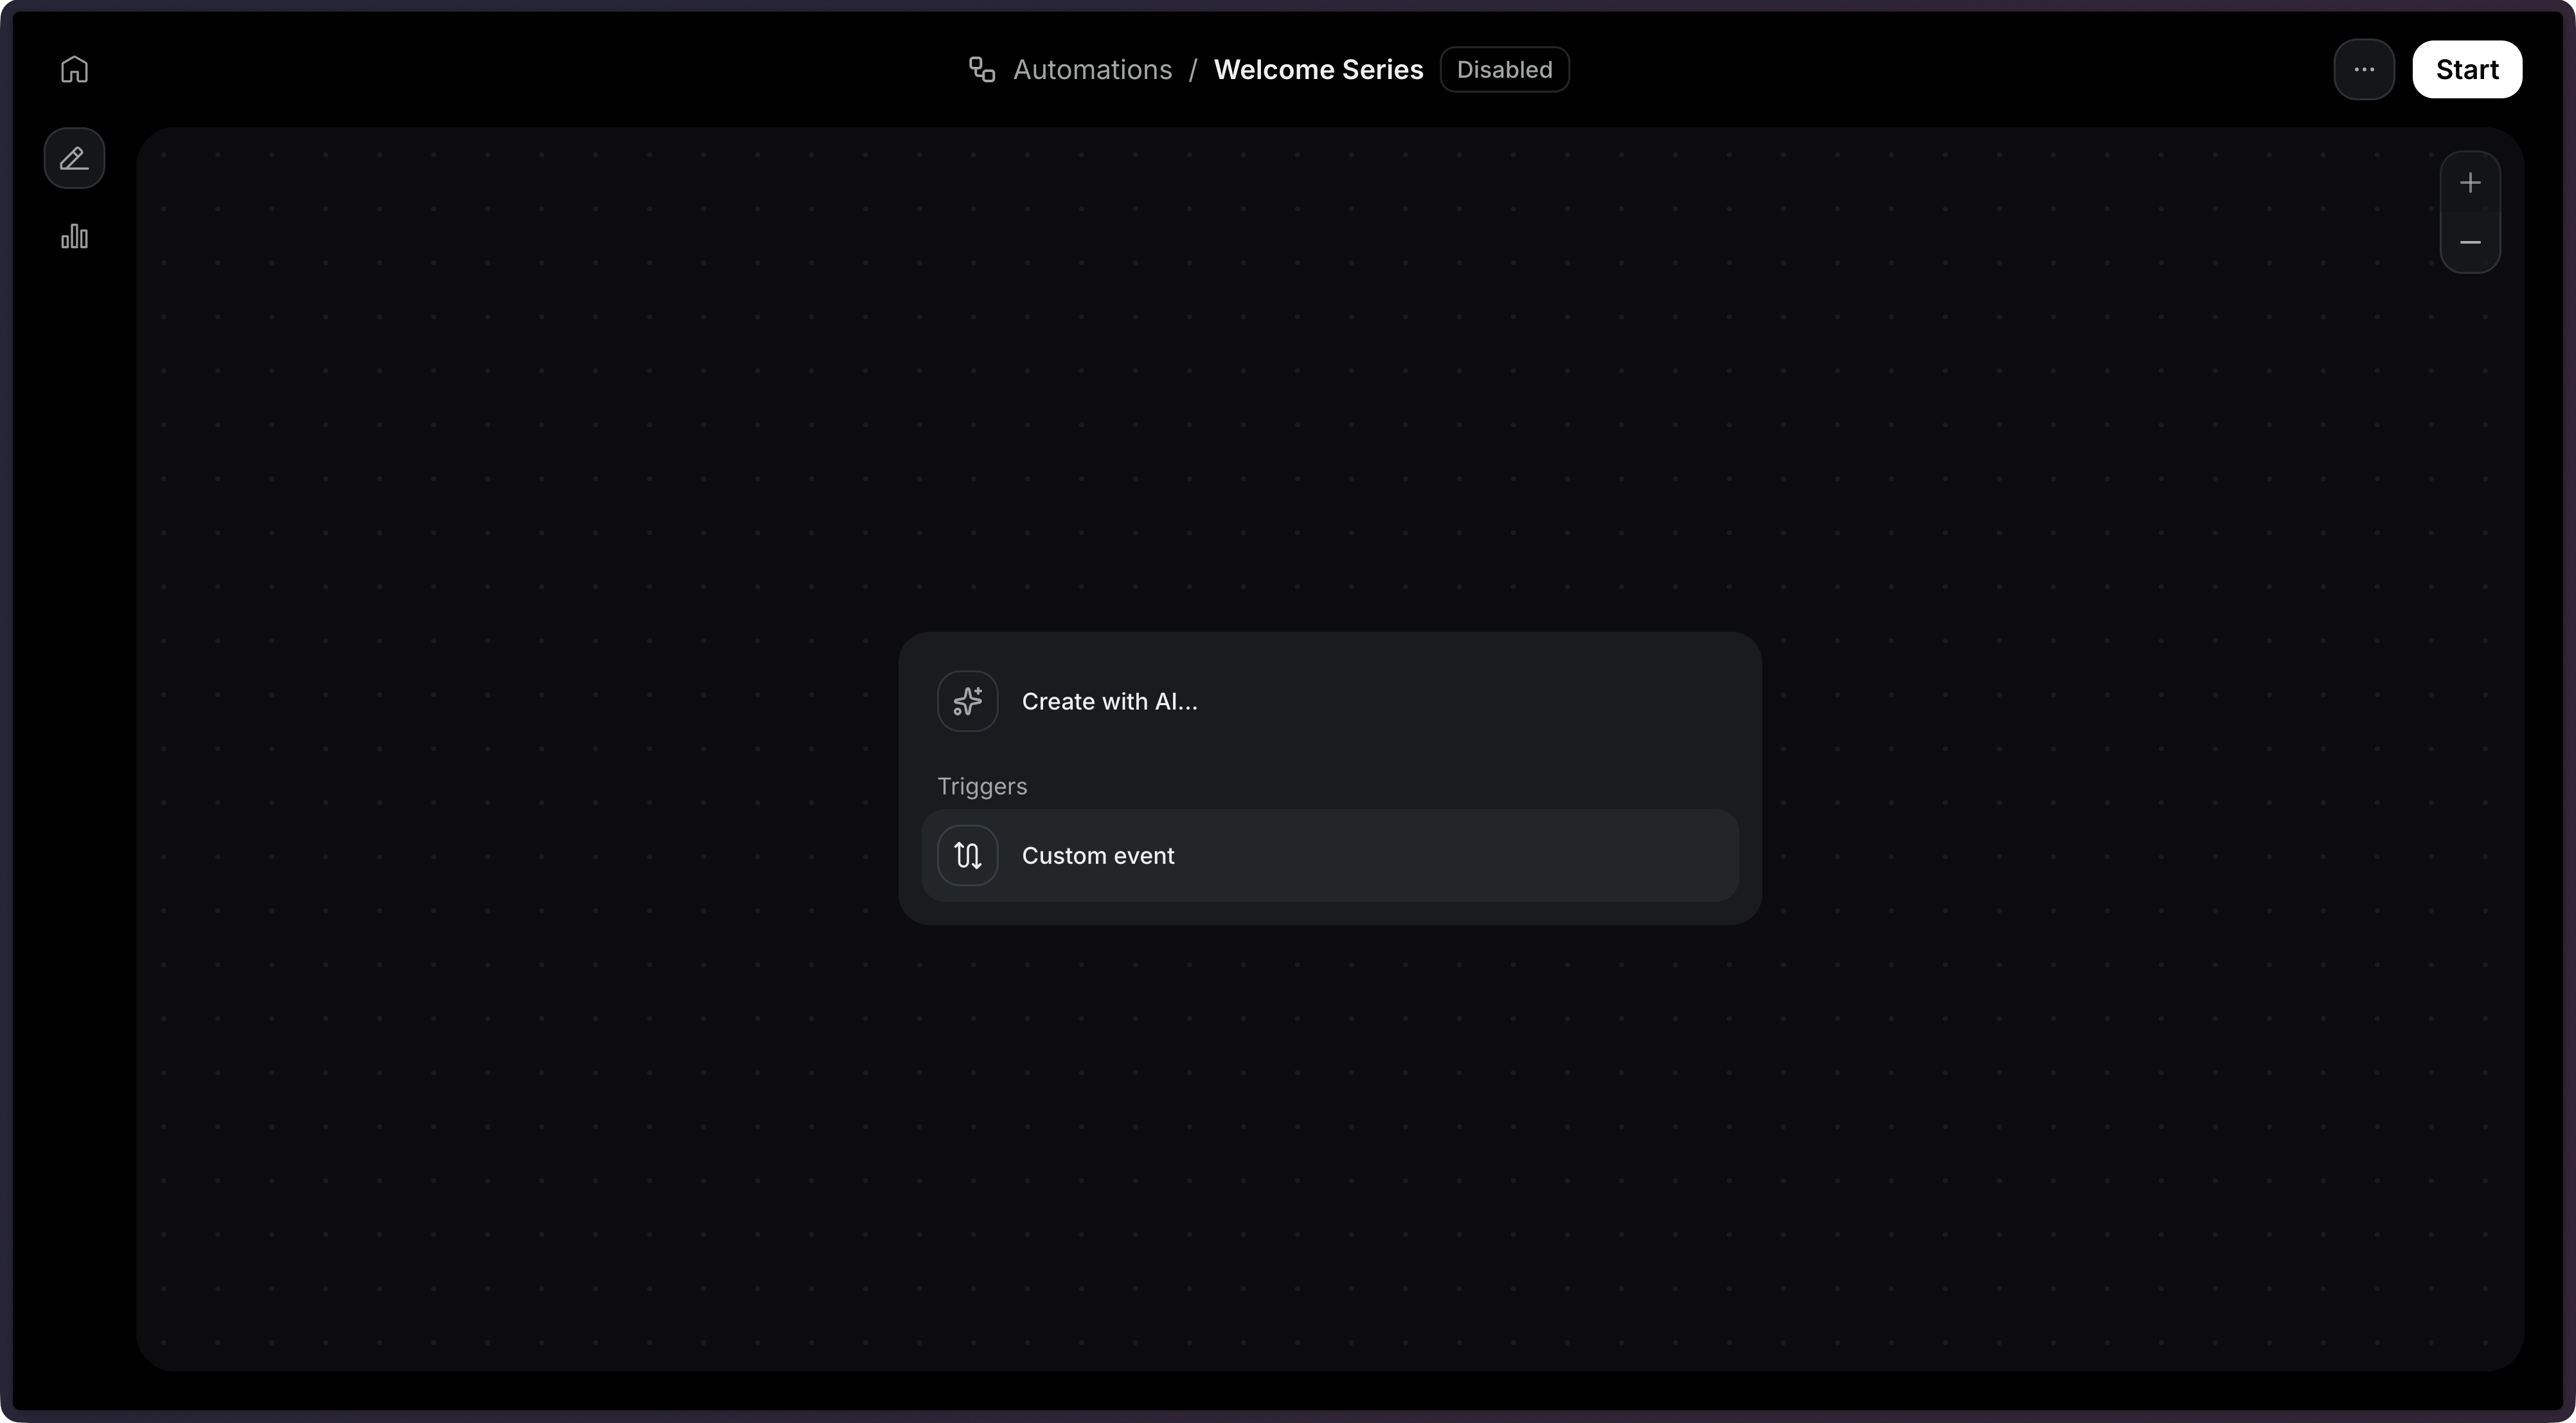
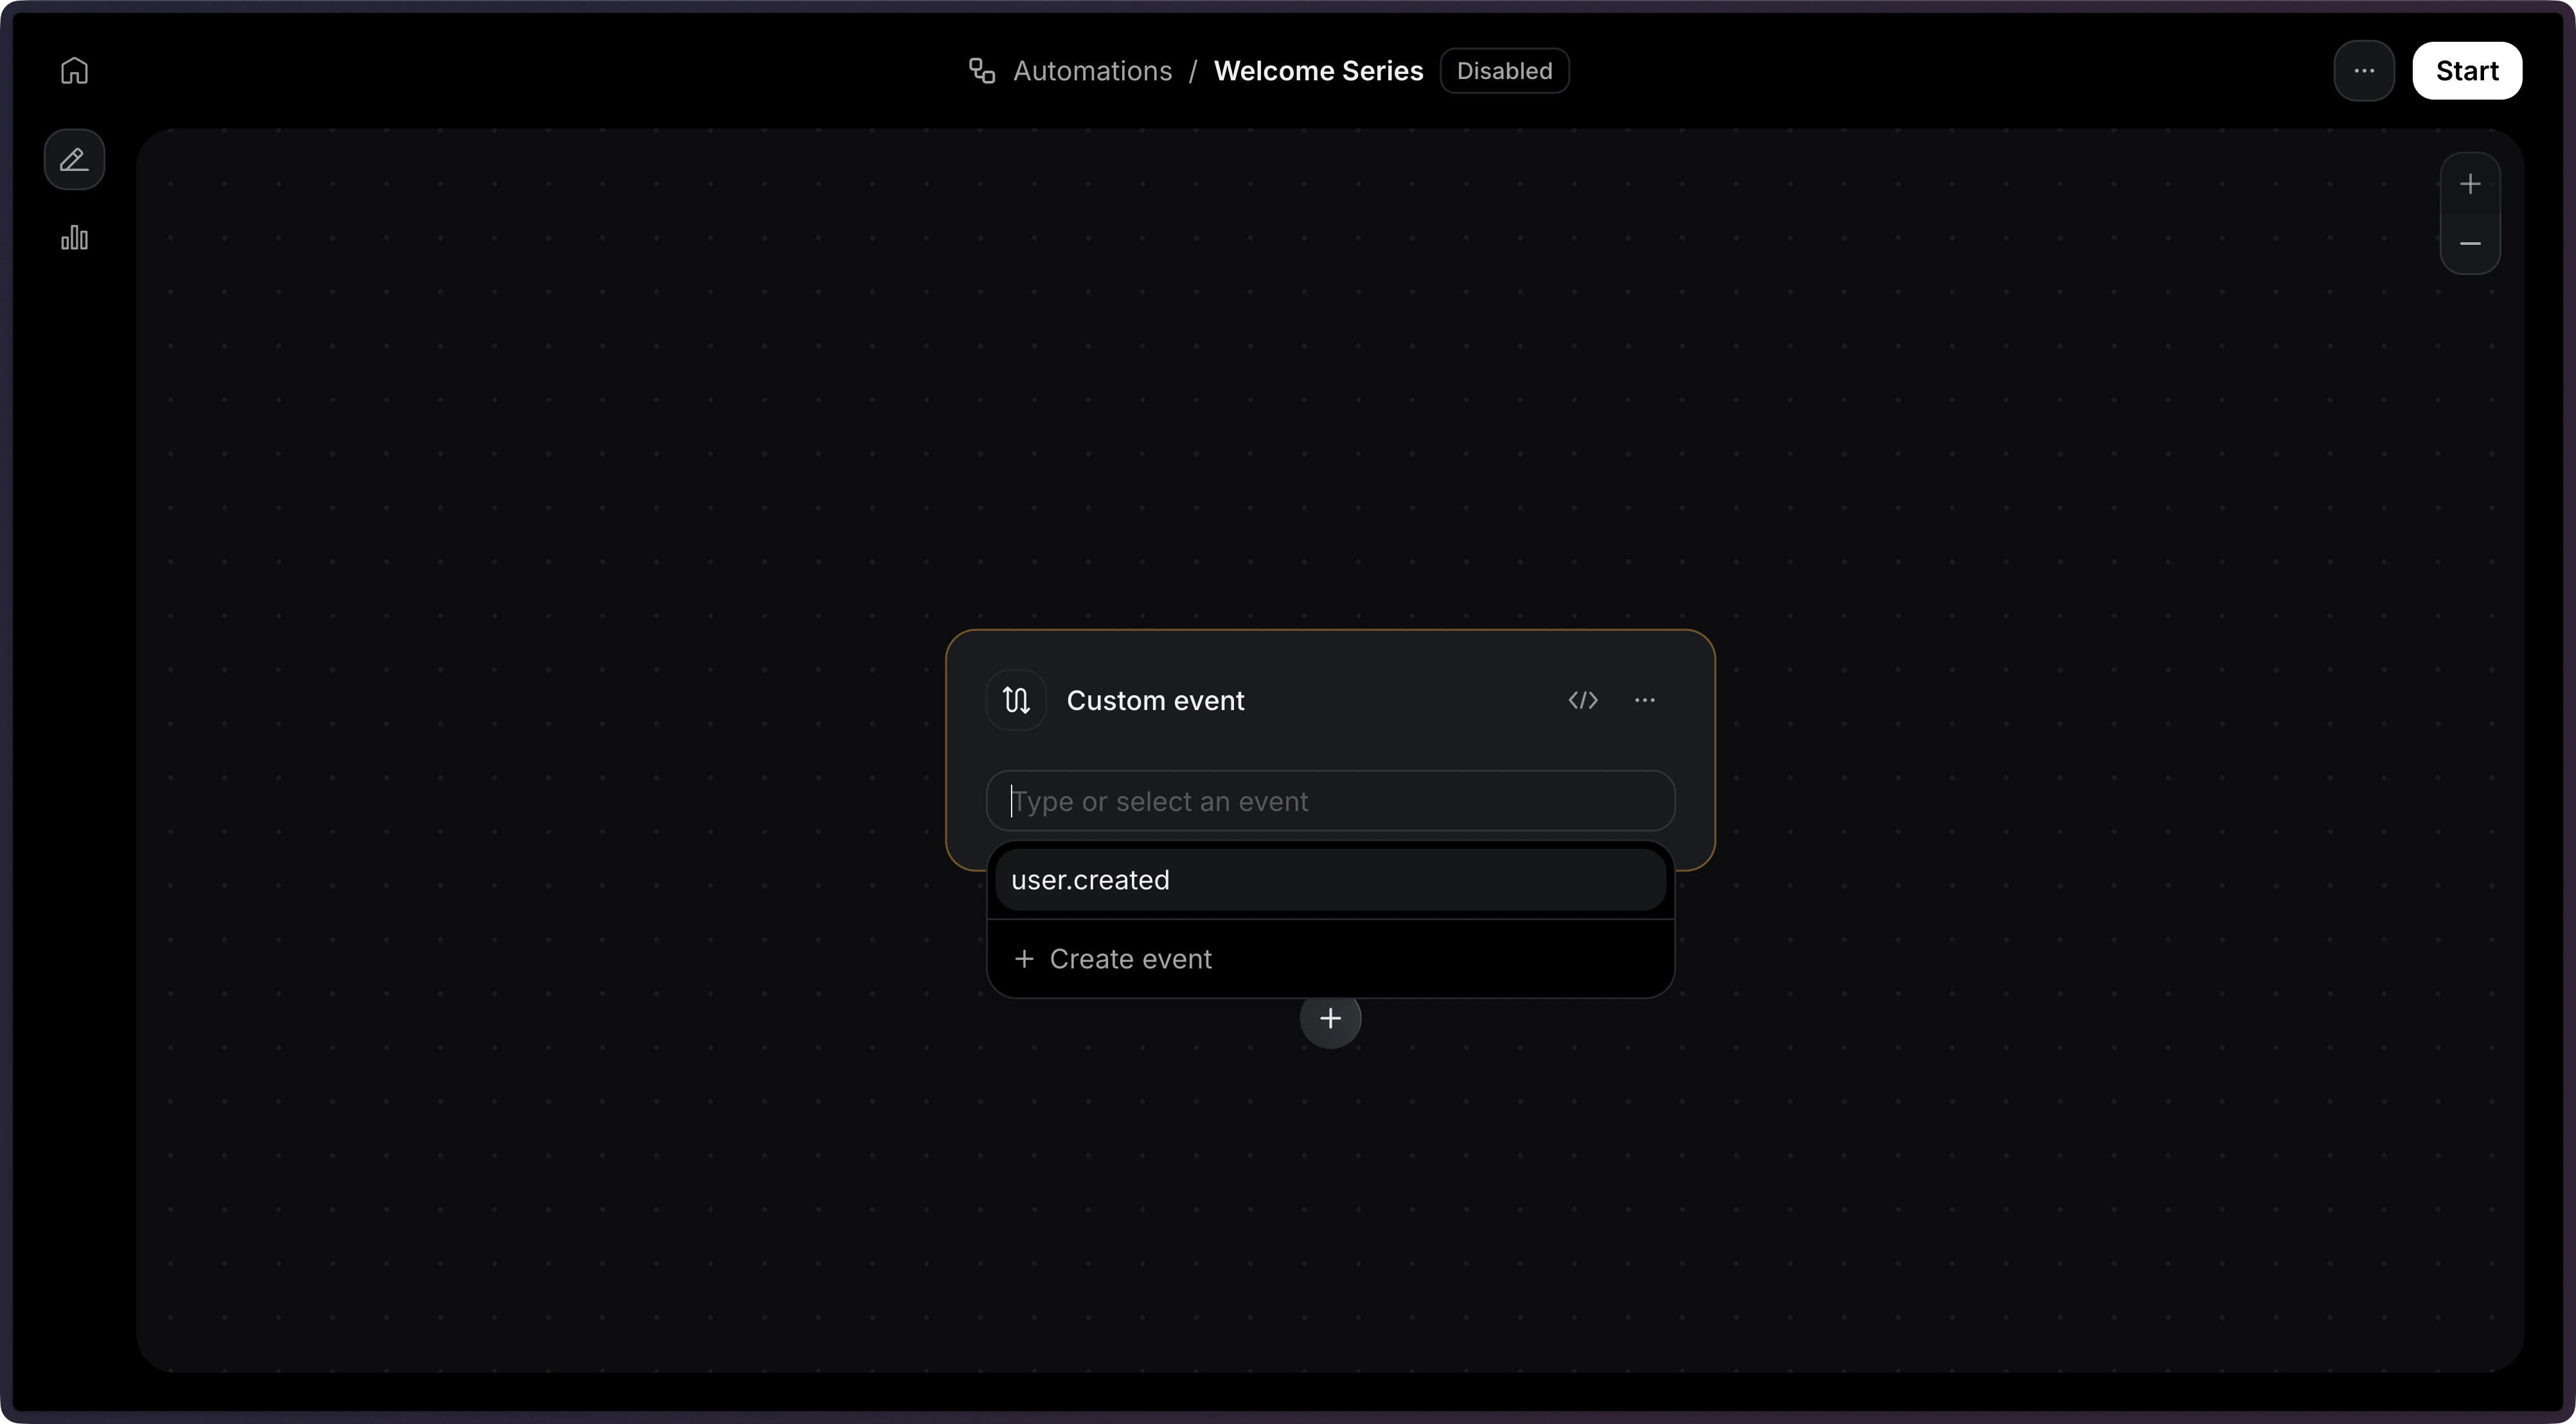
user.created or onboarding.completed, defining it inline or in the Events page.user.created as a trigger.3
Define Steps
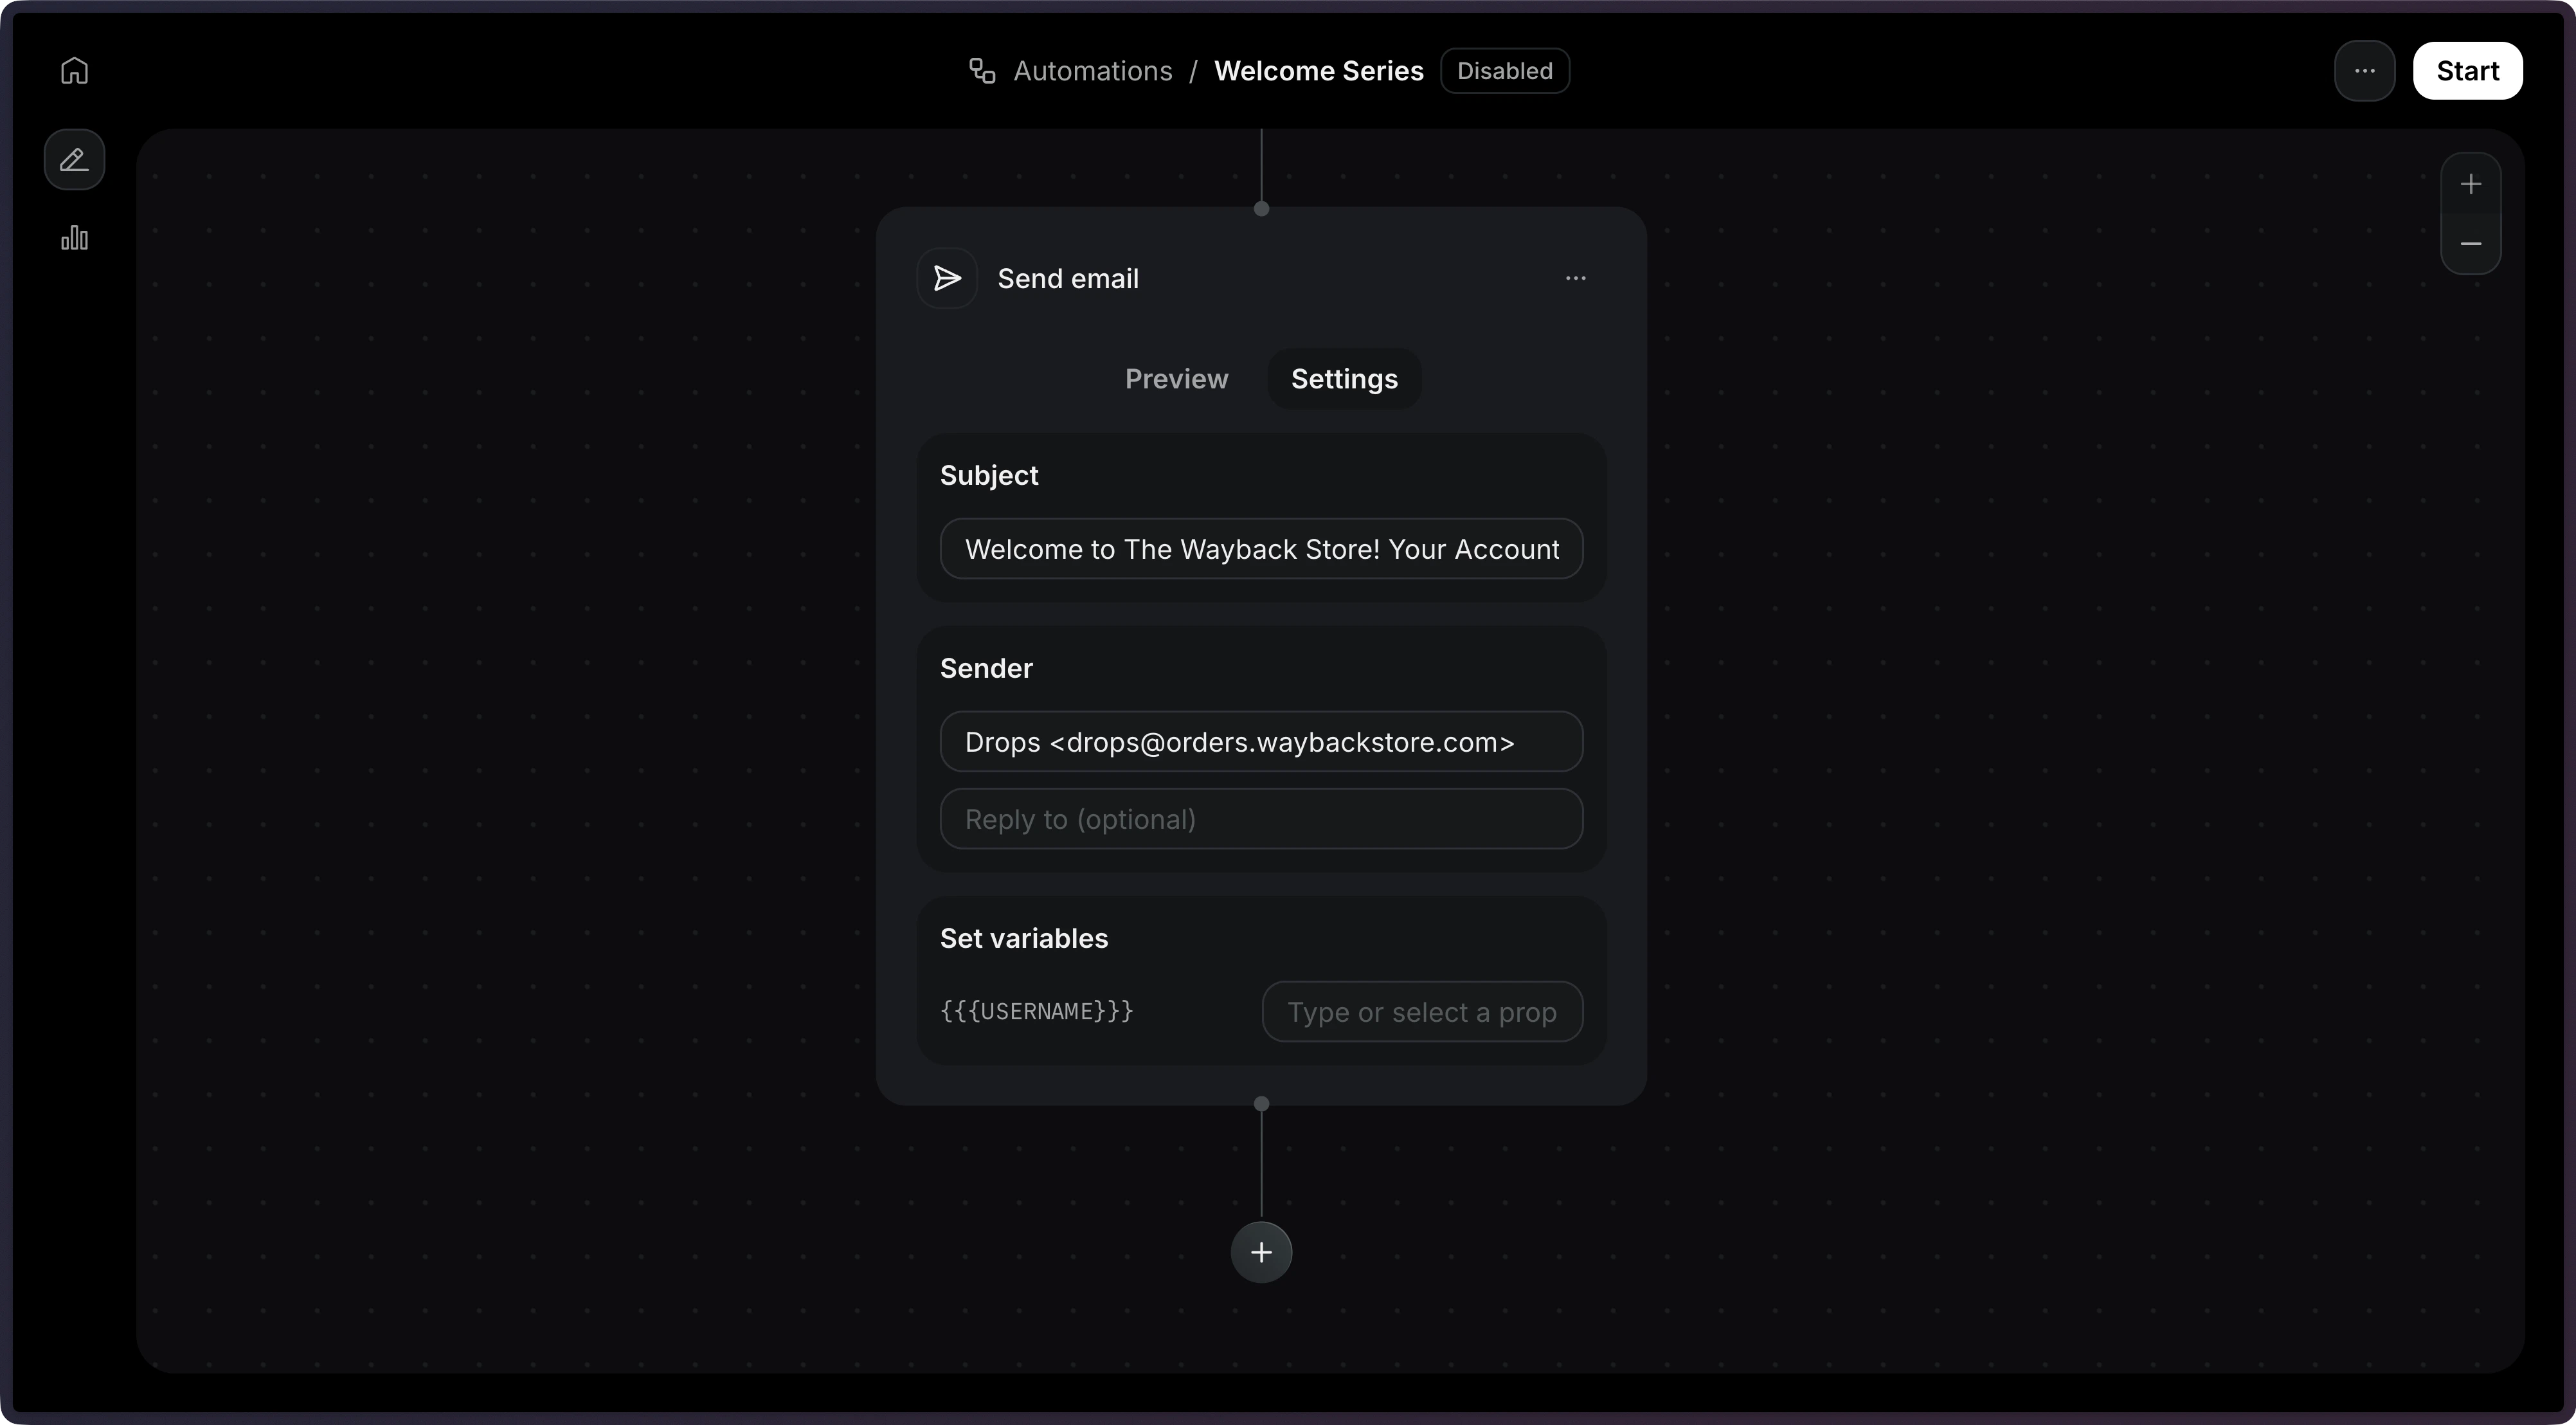
Now, we need to define the steps that will be executed.There are several step types you can add to your Automation:
On this example, we will use the Send Email step.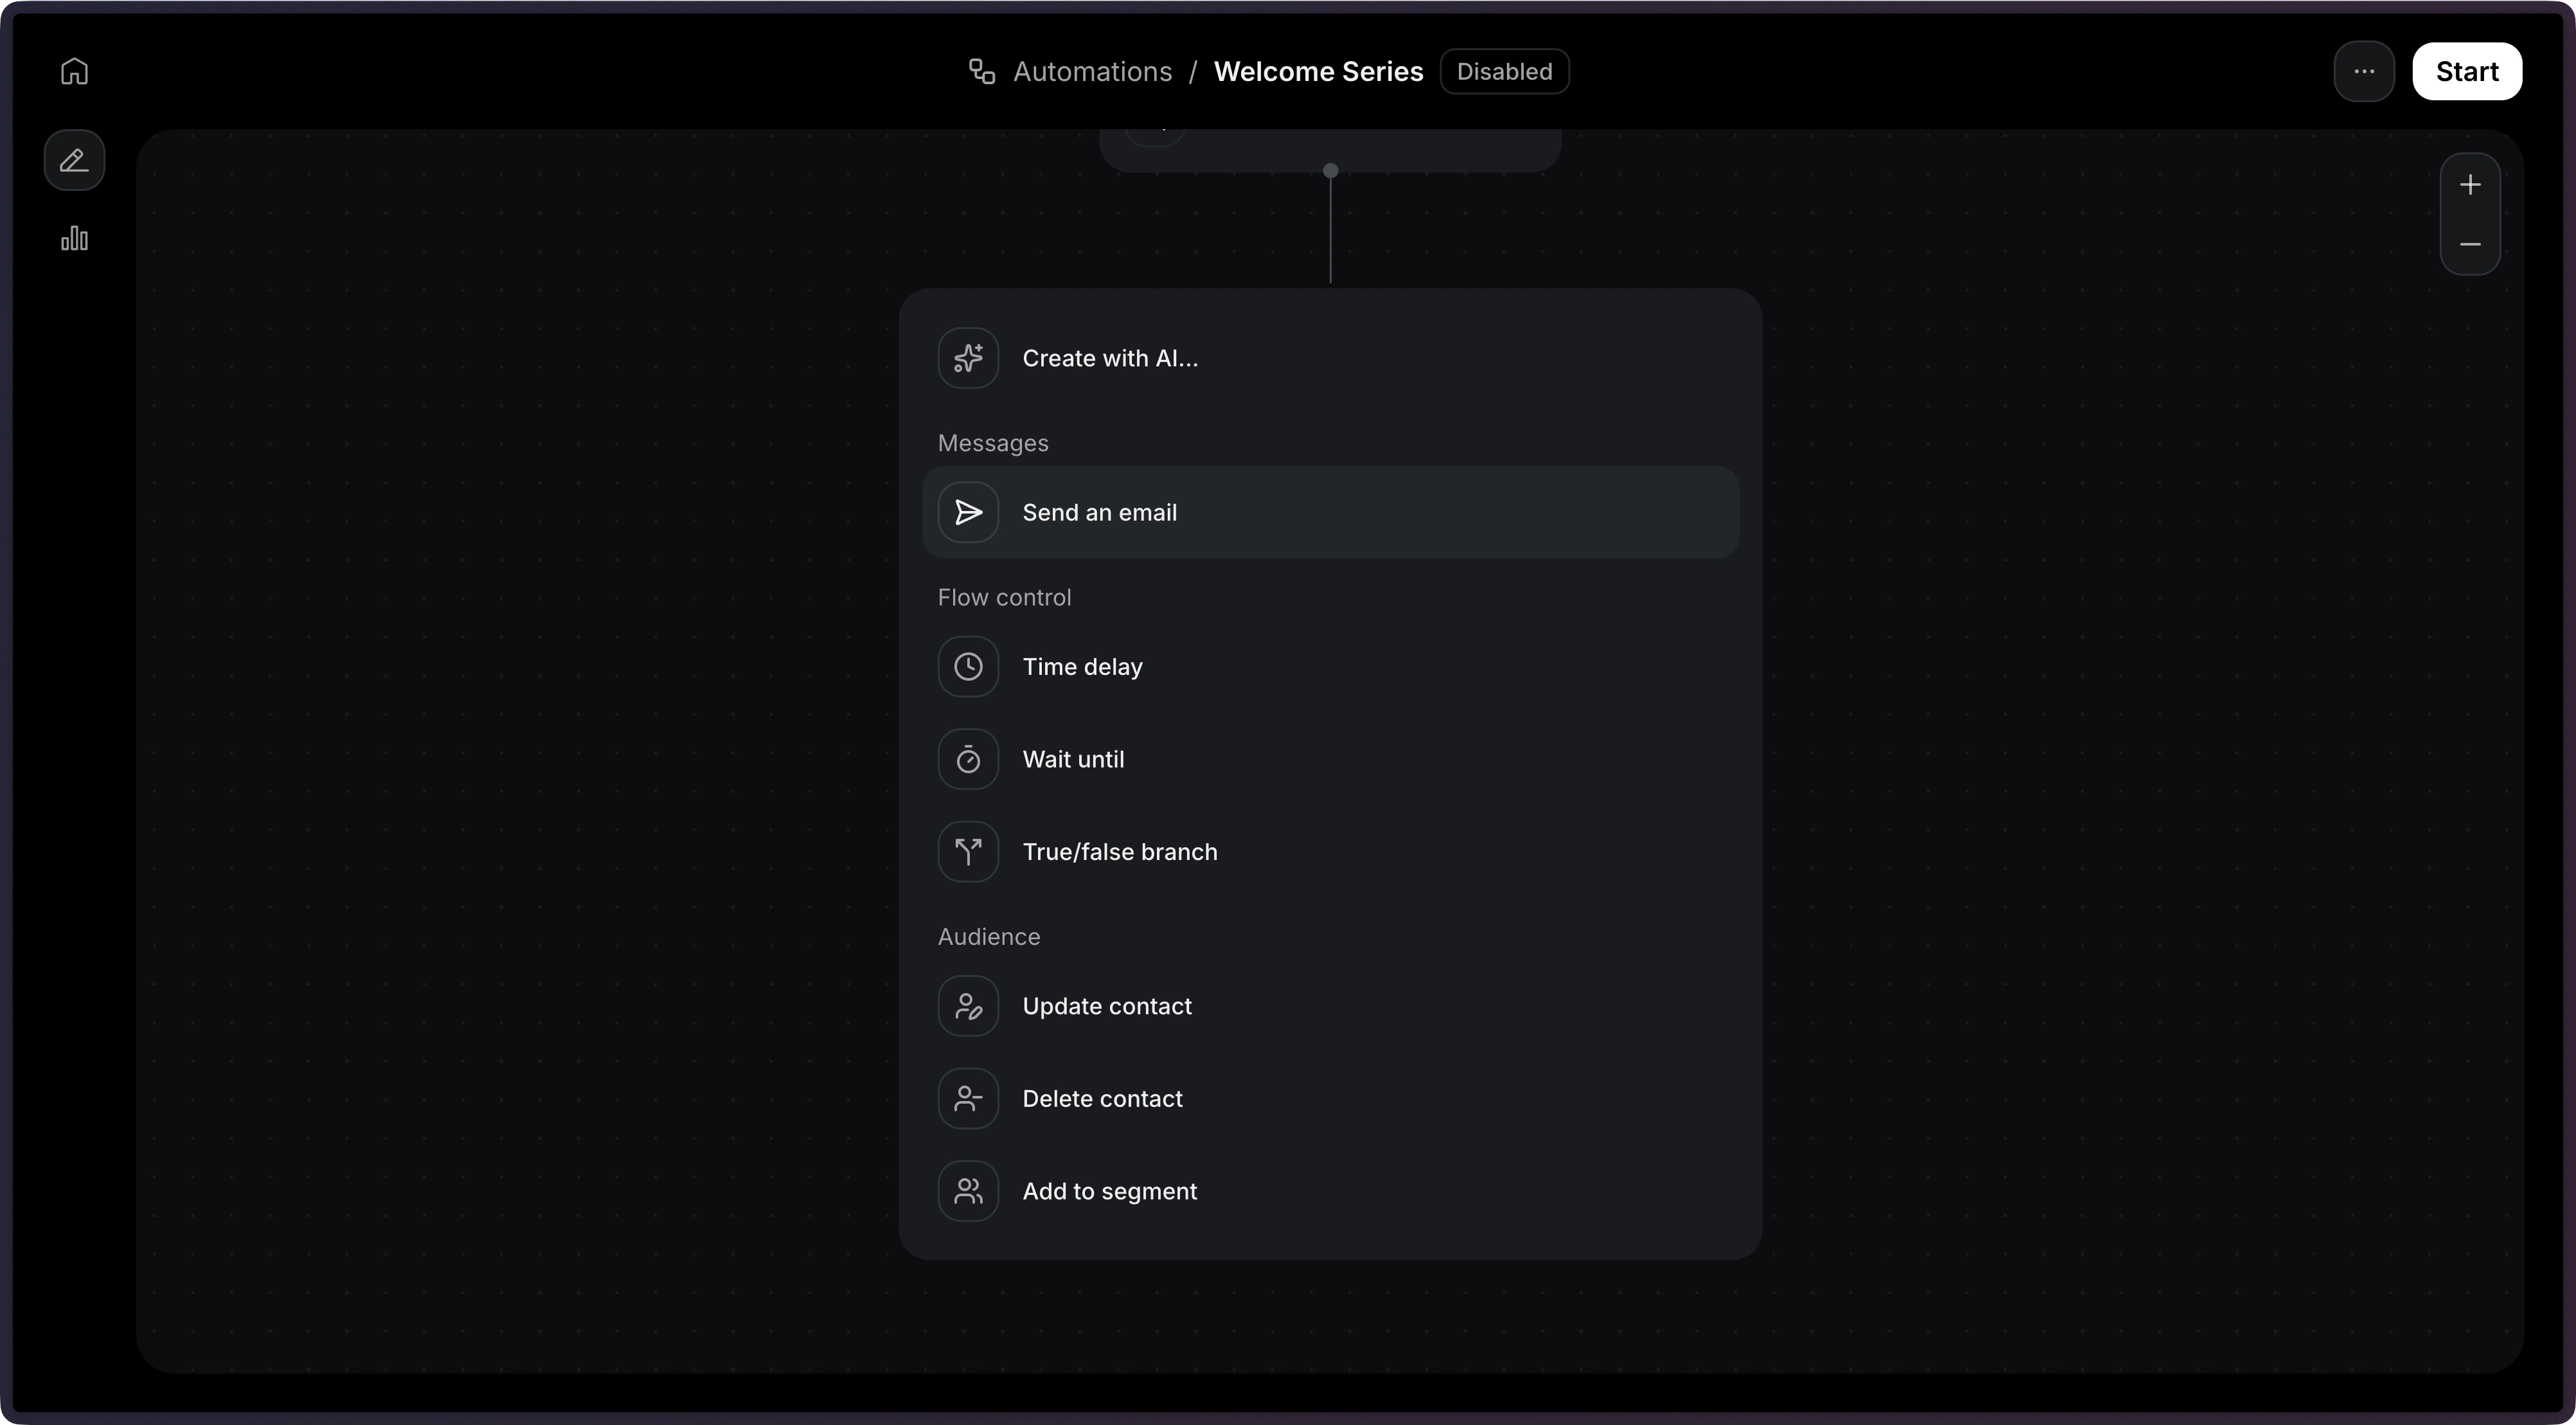
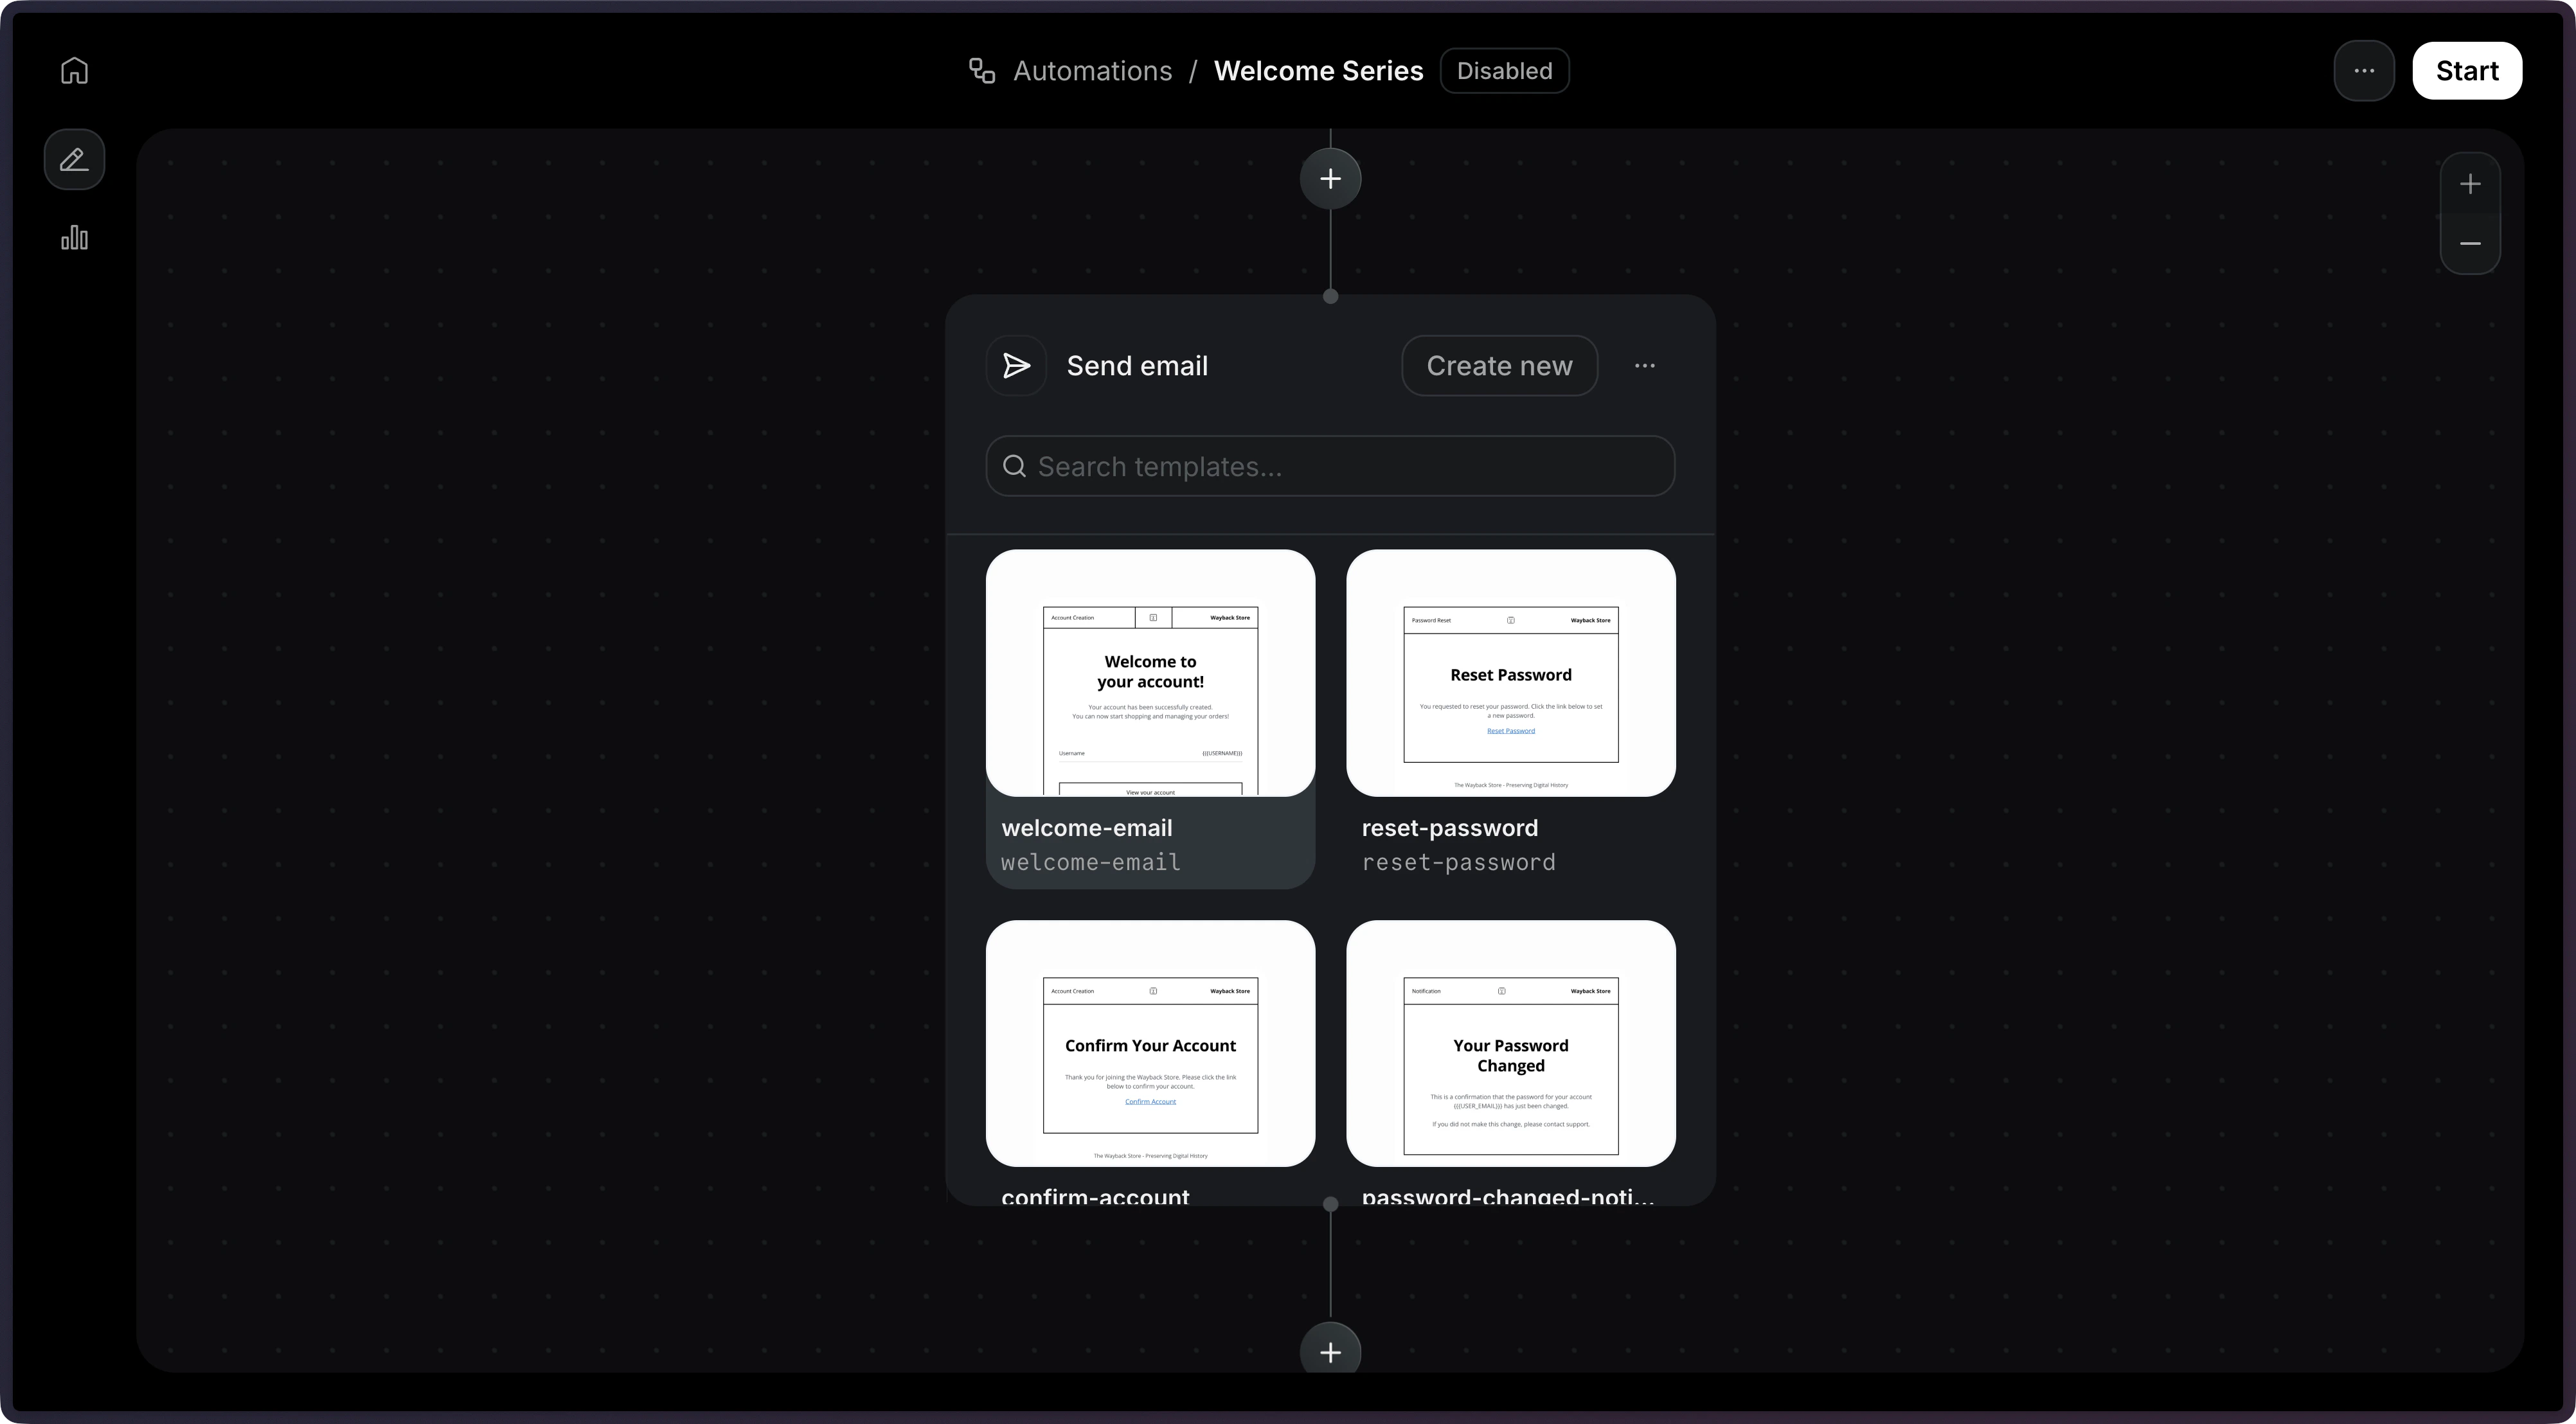
| Step type | Description |
|---|---|
| Condition | Branches the workflow based on rules |
| Delay | Pauses execution for a specified duration |
| Wait for Event | Pauses execution until a specific event is received |
| Send Email | Sends an email using a template |
| Contact Update | Updates a contact’s fields |
| Contact Delete | Deletes the contact |
| Add to Segment | Adds the contact to a segment |
While an Automation is enabled, its steps cannot be edited. To make changes,
duplicate the Automation, edit the copy, and switch over by stopping new runs
on the original. In-flight runs will finish on the version they started with.
4
Send an Event
Now, we’re ready to send an event to trigger the Automation.On your application, you can send an event to trigger the Automation by using the API.View the API reference for more details.
import { Resend } from 'resend';

const resend = new Resend('re_xxxxxxxxx');

// Trigger with a contact ID
const { data, error } = await resend.events.send({
  event: 'user.created',
  contactId: '7f2e4a3b-dfbc-4e9a-8b2c-5f3a1d6e7c8b',
  payload: {
    plan: 'pro',
  },
});

// Trigger with an email address
const { data, error } = await resend.events.send({
  event: 'user.created',
  email: 'steve.wozniak@gmail.com',
  payload: {
    plan: 'pro',
  },
});
$resend = Resend::client('re_xxxxxxxxx');

// Trigger with a contact ID
$resend->events->send([
  'event' => 'user.created',
  'contact_id' => '7f2e4a3b-dfbc-4e9a-8b2c-5f3a1d6e7c8b',
  'payload' => ['plan' => 'pro'],
]);

// Trigger with an email address
$resend->events->send([
  'event' => 'user.created',
  'email' => 'steve.wozniak@gmail.com',
  'payload' => ['plan' => 'pro'],
]);
import resend

resend.api_key = "re_xxxxxxxxx"

# Trigger with a contact ID
params: resend.Events.SendParams = {
  "event": "user.created",
  "contact_id": "7f2e4a3b-dfbc-4e9a-8b2c-5f3a1d6e7c8b",
  "payload": {
    "plan": "pro",
  },
}

resend.Events.send(params)

# Trigger with an email address
params: resend.Events.SendParams = {
  "event": "user.created",
  "email": "steve.wozniak@gmail.com",
  "payload": {
    "plan": "pro",
  },
}

resend.Events.send(params)
require "resend"

Resend.api_key = "re_xxxxxxxxx"

# Trigger with a contact ID
params = {
  event: "user.created",
  contact_id: "7f2e4a3b-dfbc-4e9a-8b2c-5f3a1d6e7c8b",
  payload: {
    plan: "pro",
  },
}

Resend::Events.send(params)

# Trigger with an email address
params = {
  event: "user.created",
  email: "steve.wozniak@gmail.com",
  payload: {
    plan: "pro",
  },
}

Resend::Events.send(params)
package main

import "github.com/resend/resend-go/v3"

func main() {
	client := resend.NewClient("re_xxxxxxxxx")

	// Trigger with a contact ID
	client.Events.Send(&resend.SendEventRequest{
		Event:     "user.created",
		ContactId: "7f2e4a3b-dfbc-4e9a-8b2c-5f3a1d6e7c8b",
		Payload: map[string]any{
			"plan": "pro",
		},
	})

	// Trigger with an email address
	client.Events.Send(&resend.SendEventRequest{
		Event: "user.created",
		Email: "steve.wozniak@gmail.com",
		Payload: map[string]any{
			"plan": "pro",
		},
	})
}
use resend_rs::{types::SendEventOptions, Resend, Result};

#[tokio::main]
async fn main() -> Result<()> {
  let resend = Resend::new("re_xxxxxxxxx");

  // Trigger with a contact ID
  let _event = resend
    .events
    .send(SendEventOptions::new("user.created").contact_id(
      "7f2e4a3b-dfbc-4e9a-8b2c-5f3a1d6e7c8b",
    ).payload(serde_json::json!({
      "plan": "pro"
    })))
    .await?;

  // Trigger with an email address
  let _event = resend
    .events
    .send(SendEventOptions::new("user.created").email(
      "steve.wozniak@gmail.com",
    ).payload(serde_json::json!({
      "plan": "pro"
    })))
    .await?;

  Ok(())
}
import com.resend.*;

public class Main {
    public static void main(String[] args) {
        Resend resend = new Resend("re_xxxxxxxxx");

        // Trigger with a contact ID
        SendEventOptions params = SendEventOptions.builder()
                .event("user.created")
                .contactId("7f2e4a3b-dfbc-4e9a-8b2c-5f3a1d6e7c8b")
                .addPayload("plan", "pro")
                .build();

        SendEventResponseSuccess data = resend.events().send(params);

        // Trigger with an email address
        SendEventOptions params2 = SendEventOptions.builder()
                .event("user.created")
                .email("steve.wozniak@gmail.com")
                .addPayload("plan", "pro")
                .build();

        SendEventResponseSuccess data2 = resend.events().send(params2);
    }
}
using Resend;
using System.Text.Json;

IResend resend = ResendClient.Create( "re_xxxxxxxxx" );

var payload = JsonSerializer.SerializeToElement( new { plan = "pro" } );

// Trigger with a contact ID
var resp = await resend.EventSendAsync( new EventSendData()
{
    Event = "user.created",
    ContactId = new Guid( "7f2e4a3b-dfbc-4e9a-8b2c-5f3a1d6e7c8b" ),
    Payload = payload,
} );
Console.WriteLine( "Event={0}", resp.Content.Event );

// Trigger with an email address
await resend.EventSendAsync( new EventSendData()
{
    Event = "user.created",
    Email = "steve.wozniak@gmail.com",
    Payload = payload,
} );
# Trigger with a contact ID
curl -X POST 'https://api.resend.com/events/send' \
     -H 'Authorization: Bearer re_xxxxxxxxx' \
     -H 'Content-Type: application/json' \
     -d '{
  "event": "user.created",
  "contact_id": "7f2e4a3b-dfbc-4e9a-8b2c-5f3a1d6e7c8b",
  "payload": {
    "plan": "pro"
  }
}'

# Trigger with an email address
curl -X POST 'https://api.resend.com/events/send' \
     -H 'Authorization: Bearer re_xxxxxxxxx' \
     -H 'Content-Type: application/json' \
     -d '{
  "event": "user.created",
  "email": "steve.wozniak@gmail.com",
  "payload": {
    "plan": "pro"
  }
}'
# Trigger with a contact ID
resend events send \
  --event user.created \
  --contact-id 7f2e4a3b-dfbc-4e9a-8b2c-5f3a1d6e7c8b \
  --payload '{"plan":"pro"}'

# Trigger with an email address
resend events send \
  --event user.created \
  --email steve.wozniak@gmail.com \
  --payload '{"plan":"pro"}'
5
Monitor Runs
After sending events, you can monitor your Automation executions through Runs. Each time an event triggers an Automation, a Run is created to track the execution.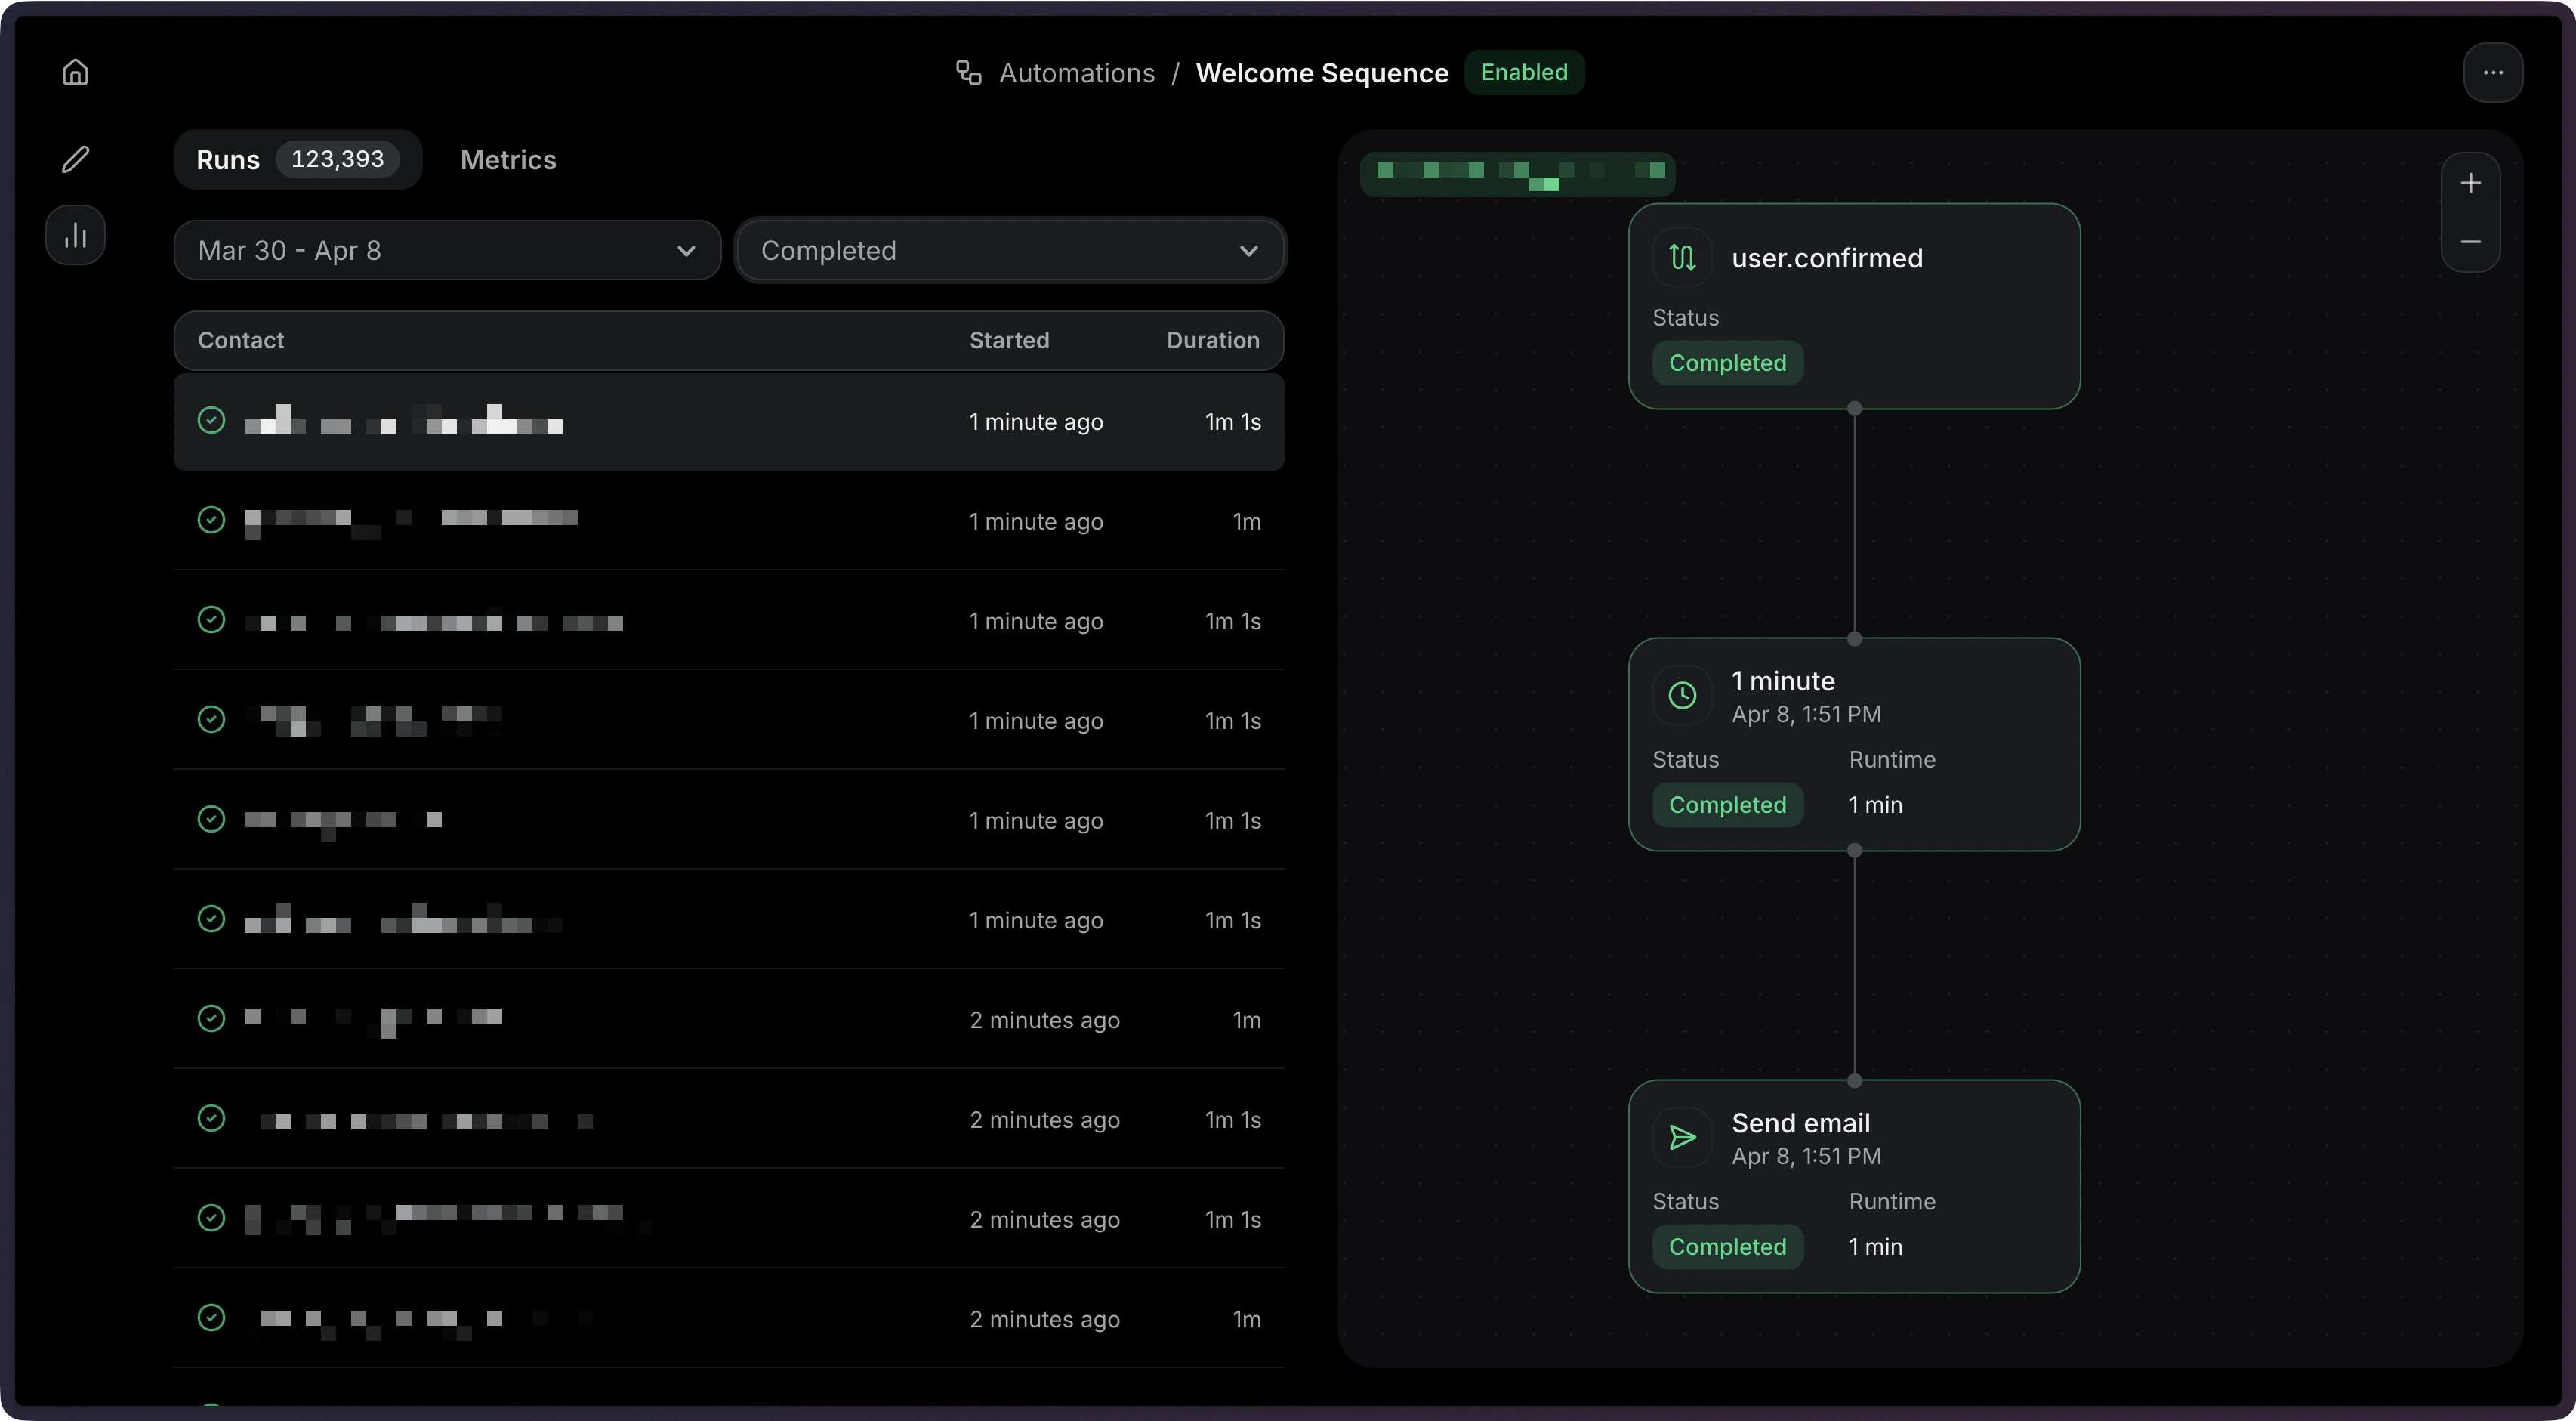
- View Run statuses and execution details
- Filter Runs by status (
running,completed,failed,cancelled) - Debug failed Runs with step-level error information
- Stop Automation Runs when needed
1
Create Automation
When creating an Automation via the API, you can create an entire Automation flow with a single request. It accepts four parameters (status is optional and defaults to The trigger is defined as the first item in the
disabled):name: The name of the Automation.status: The status of the Automation.steps: The steps that compose the Automation graph.connections: The connections between steps in the Automation graph.
import { Resend } from 'resend';

const resend = new Resend('re_xxxxxxxxx');

const { data, error } = await resend.automations.create({
  name: 'Welcome series',
  status: 'disabled',
  steps: [
    {
      key: 'start',
      type: 'trigger',
      config: { eventName: 'user.created' },
    },
    {
      key: 'welcome',
      type: 'send_email',
      config: {
        template: { id: '34a080c9-b17d-4187-ad80-5af20266e535' },
      },
    },
  ],
  connections: [{ from: 'start', to: 'welcome' }],
});
$resend = Resend::client('re_xxxxxxxxx');

$resend->automations->create([
  'name' => 'Welcome series',
  'status' => 'disabled',
  'steps' => [
    [
      'key' => 'start',
      'type' => 'trigger',
      'config' => ['event_name' => 'user.created'],
    ],
    [
      'key' => 'welcome',
      'type' => 'send_email',
      'config' => [
        'template' => ['id' => '34a080c9-b17d-4187-ad80-5af20266e535'],
      ],
    ],
  ],
  'connections' => [['from' => 'start', 'to' => 'welcome']],
]);
import resend

resend.api_key = "re_xxxxxxxxx"

params: resend.Automations.CreateParams = {
  "name": "Welcome series",
  "status": "disabled",
  "steps": [
    {
      "key": "start",
      "type": "trigger",
      "config": {"event_name": "user.created"},
    },
    {
      "key": "welcome",
      "type": "send_email",
      "config": {
        "template": {"id": "34a080c9-b17d-4187-ad80-5af20266e535"},
      },
    },
  ],
  "connections": [{"from": "start", "to": "welcome"}],
}

resend.Automations.create(params)
require "resend"

Resend.api_key = "re_xxxxxxxxx"

params = {
  name: "Welcome series",
  status: "disabled",
  steps: [
    {
      key: "start",
      type: "trigger",
      config: { event_name: "user.created" },
    },
    {
      key: "welcome",
      type: "send_email",
      config: {
        template: { id: "34a080c9-b17d-4187-ad80-5af20266e535" },
      },
    },
  ],
  connections: [{ from: "start", to: "welcome" }],
}

Resend::Automations.create(params)
package main

import "github.com/resend/resend-go/v3"

func main() {
	client := resend.NewClient("re_xxxxxxxxx")

	params := &resend.CreateAutomationRequest{
		Name:   "Welcome series",
		Status: resend.AutomationStatusDisabled,
		Steps: []resend.AutomationStep{
			{
				Key:  "start",
				Type: resend.AutomationStepTypeTrigger,
				Config: map[string]any{
					"event_name": "user.created",
				},
			},
			{
				Key:  "welcome",
				Type: resend.AutomationStepTypeSendEmail,
				Config: map[string]any{
					"template": map[string]any{
						"id": "34a080c9-b17d-4187-ad80-5af20266e535",
					},
				},
			},
		},
		Connections: []resend.AutomationConnection{
			{From: "start", To: "welcome"},
		},
	}

	client.Automations.Create(params)
}
use resend_rs::{
  types::{
    AutomationStatus, AutomationTemplate, Connection, CreateAutomationOptions, SendEmailStepConfig,
    Step, TriggerStepConfig,
  },
  Resend, Result,
};

#[tokio::main]
async fn main() -> Result<()> {
  let resend = Resend::new("re_xxxxxxxxx");

  let opts = CreateAutomationOptions {
    name: "Welcome series".to_owned(),
    status: AutomationStatus::Disabled,
    steps: vec![
      Step::Trigger {
        key: "start".to_owned(),
        config: TriggerStepConfig {
          event_name: "user.created".to_owned(),
        },
      },
      Step::SendEmail {
        key: "welcome".to_owned(),
        config: SendEmailStepConfig::new(AutomationTemplate::new(
          "34a080c9-b17d-4187-ad80-5af20266e535",
        )),
      },
    ],
    connections: vec![Connection::new("start", "welcome")],
  };
  let _automation = resend.automations.create(opts).await?;

  Ok(())
}
import com.resend.*;

public class Main {
    public static void main(String[] args) {
        Resend resend = new Resend("re_xxxxxxxxx");

        CreateAutomationOptions options = CreateAutomationOptions.builder()
                .name("Welcome series")
                .status(AutomationStatus.DISABLED)
                .steps(
                    AutomationStep.trigger("start")
                        .eventName("user.created")
                        .build(),
                    AutomationStep.sendEmail("welcome")
                        .template("34a080c9-b17d-4187-ad80-5af20266e535")
                        .build()
                )
                .connections(
                    AutomationConnection.builder()
                        .from("start")
                        .to("welcome")
                        .build()
                )
                .build();

        CreateAutomationResponseSuccess response = resend.automations().create(options);
    }
}
using Resend;
using System.Text.Json;

IResend resend = ResendClient.Create( "re_xxxxxxxxx" );

var startConfig = JsonSerializer.SerializeToElement( new { event_name = "user.created" } );
var welcomeConfig = JsonSerializer.SerializeToElement( new { template = new { id = "34a080c9-b17d-4187-ad80-5af20266e535" } } );

var resp = await resend.AutomationCreateAsync( new AutomationCreateData()
{
    Name = "Welcome series",
    Status = "disabled",
    Steps = new List<AutomationStepData>
    {
        new AutomationStepData { Ref = "start", Type = "trigger", Config = startConfig },
        new AutomationStepData { Ref = "welcome", Type = "send_email", Config = welcomeConfig },
    },
    Connections = new List<AutomationEdge>
    {
        new AutomationEdge { From = "start", To = "welcome" },
    },
} );
Console.WriteLine( "AutomationId={0}", resp.Content );
curl -X POST 'https://api.resend.com/automations' \
     -H 'Authorization: Bearer re_xxxxxxxxx' \
     -H 'Content-Type: application/json' \
     -d '{
  "name": "Welcome series",
  "steps": [
    {
      "key": "start",
      "type": "trigger",
      "config": { "event_name": "user.created" }
    },
    {
      "key": "welcome",
      "type": "send_email",
      "config": {
        "template": { "id": "34a080c9-b17d-4187-ad80-5af20266e535" }
      }
    }
  ],
  "connections": [
    { "from": "start", "to": "welcome" }
  ]
}'
resend automations create --name "Welcome series" --file ./automation.json
steps array with type: 'trigger'. It requires you’ve created a custom event like user.created or onboarding.completed.For more help creating an Automation via the API, see the Create Automation API reference.2
Send an Event
Trigger the Automation by sending an event from your application.View the Send Event API reference for more details.
import { Resend } from 'resend';

const resend = new Resend('re_xxxxxxxxx');

// Trigger with a contact ID
const { data, error } = await resend.events.send({
  event: 'user.created',
  contactId: '7f2e4a3b-dfbc-4e9a-8b2c-5f3a1d6e7c8b',
  payload: {
    plan: 'pro',
  },
});

// Trigger with an email address
const { data, error } = await resend.events.send({
  event: 'user.created',
  email: 'steve.wozniak@gmail.com',
  payload: {
    plan: 'pro',
  },
});
$resend = Resend::client('re_xxxxxxxxx');

// Trigger with a contact ID
$resend->events->send([
  'event' => 'user.created',
  'contact_id' => '7f2e4a3b-dfbc-4e9a-8b2c-5f3a1d6e7c8b',
  'payload' => ['plan' => 'pro'],
]);

// Trigger with an email address
$resend->events->send([
  'event' => 'user.created',
  'email' => 'steve.wozniak@gmail.com',
  'payload' => ['plan' => 'pro'],
]);
import resend

resend.api_key = "re_xxxxxxxxx"

# Trigger with a contact ID
params: resend.Events.SendParams = {
  "event": "user.created",
  "contact_id": "7f2e4a3b-dfbc-4e9a-8b2c-5f3a1d6e7c8b",
  "payload": {
    "plan": "pro",
  },
}

resend.Events.send(params)

# Trigger with an email address
params: resend.Events.SendParams = {
  "event": "user.created",
  "email": "steve.wozniak@gmail.com",
  "payload": {
    "plan": "pro",
  },
}

resend.Events.send(params)
require "resend"

Resend.api_key = "re_xxxxxxxxx"

# Trigger with a contact ID
params = {
  event: "user.created",
  contact_id: "7f2e4a3b-dfbc-4e9a-8b2c-5f3a1d6e7c8b",
  payload: {
    plan: "pro",
  },
}

Resend::Events.send(params)

# Trigger with an email address
params = {
  event: "user.created",
  email: "steve.wozniak@gmail.com",
  payload: {
    plan: "pro",
  },
}

Resend::Events.send(params)
package main

import "github.com/resend/resend-go/v3"

func main() {
	client := resend.NewClient("re_xxxxxxxxx")

	// Trigger with a contact ID
	params := &resend.SendEventRequest{
		Event:     "user.created",
		ContactId: "7f2e4a3b-dfbc-4e9a-8b2c-5f3a1d6e7c8b",
		Payload: map[string]any{
			"plan": "pro",
		},
	}

	client.Events.Send(params)

	// Trigger with an email address
	params = &resend.SendEventRequest{
		Event: "user.created",
		Email: "steve.wozniak@gmail.com",
		Payload: map[string]any{
			"plan": "pro",
		},
	}

	client.Events.Send(params)
}
use resend_rs::{
  json,
  types::{ContactIdOrEmail, SendEventOptions},
  Resend, Result,
};

#[tokio::main]
async fn main() -> Result<()> {
  let resend = Resend::new("re_xxxxxxxxx");

  let opts = SendEventOptions {
    event: "user.created".to_owned(),
    contact_id_or_email: ContactIdOrEmail::ContactId(
      "7f2e4a3b-dfbc-4e9a-8b2c-5f3a1d6e7c8b".to_owned(),
    ),
    payload: json!({
      "plan": "pro"
    }),
  };

  let opts = SendEventOptions {
    event: "user.created".to_owned(),
    contact_id_or_email: ContactIdOrEmail::Email("steve.wozniak@gmail.com".to_owned()),
    payload: json!({
      "plan": "pro"
    }),
  };

  let _event = resend.events.send(opts).await?;

  Ok(())
}
import com.resend.*;

public class Main {
    public static void main(String[] args) {
        Resend resend = new Resend("re_xxxxxxxxx");

        // Trigger with a contact ID
        SendEventOptions params = SendEventOptions.builder()
                .event("user.created")
                .contactId("7f2e4a3b-dfbc-4e9a-8b2c-5f3a1d6e7c8b")
                .addPayload("plan", "pro")
                .build();

        SendEventResponseSuccess data = resend.events().send(params);

        // Trigger with an email address
        SendEventOptions params = SendEventOptions.builder()
                .event("user.created")
                .email("steve.wozniak@gmail.com")
                .addPayload("plan", "pro")
                .build();

        SendEventResponseSuccess data = resend.events().send(params);
    }
}
using Resend;
using System.Text.Json;

IResend resend = ResendClient.Create( "re_xxxxxxxxx" );

var payload = JsonSerializer.SerializeToElement( new { plan = "pro" } );

// Trigger with a contact ID
var resp = await resend.EventSendAsync( new EventSendData()
{
    Event = "user.created",
    ContactId = new Guid( "7f2e4a3b-dfbc-4e9a-8b2c-5f3a1d6e7c8b" ),
    Payload = payload,
} );
Console.WriteLine( "Event={0}", resp.Content.Event );

// Trigger with an email address
await resend.EventSendAsync( new EventSendData()
{
    Event = "user.created",
    Email = "steve.wozniak@gmail.com",
    Payload = payload,
} );
# Trigger with a contact ID
curl -X POST 'https://api.resend.com/events/send' \
     -H 'Authorization: Bearer re_xxxxxxxxx' \
     -H 'Content-Type: application/json' \
     -d '{
  "event": "user.created",
  "contact_id": "7f2e4a3b-dfbc-4e9a-8b2c-5f3a1d6e7c8b",
  "payload": {
    "plan": "pro"
  }
}'

# Trigger with an email address
curl -X POST 'https://api.resend.com/events/send' \
     -H 'Authorization: Bearer re_xxxxxxxxx' \
     -H 'Content-Type: application/json' \
     -d '{
  "event": "user.created",
  "email": "steve.wozniak@gmail.com",
  "payload": {
    "plan": "pro"
  }
}'
# Trigger with a contact ID
resend events send \
  --event user.created \
  --contact-id 7f2e4a3b-dfbc-4e9a-8b2c-5f3a1d6e7c8b \
  --payload '{"plan":"pro"}'

# Trigger with an email address
resend events send \
  --event user.created \
  --email steve.wozniak@gmail.com \
  --payload '{"plan":"pro"}'
3
Monitor Runs
After sending events, track your Automation executions through Runs.You can filter Runs by status (
import { Resend } from 'resend';

const resend = new Resend('re_xxxxxxxxx');

const { data, error } = await resend.automations.runs.list({
  automationId: 'c9b16d4f-ba6c-4e2e-b044-6bf4404e57fd',
});
$resend = Resend::client('re_xxxxxxxxx');

$resend->automations->runs->list('c9b16d4f-ba6c-4e2e-b044-6bf4404e57fd');
import resend

resend.api_key = "re_xxxxxxxxx"

resend.Automations.Runs.list("c9b16d4f-ba6c-4e2e-b044-6bf4404e57fd")
require "resend"

Resend.api_key = "re_xxxxxxxxx"

Resend::Automations::Runs.list("c9b16d4f-ba6c-4e2e-b044-6bf4404e57fd")
package main

import "github.com/resend/resend-go/v3"

func main() {
	client := resend.NewClient("re_xxxxxxxxx")

	client.Automations.ListRuns("c9b16d4f-ba6c-4e2e-b044-6bf4404e57fd")
}
use resend_rs::{list_opts::ListOptions, Resend, Result};

#[tokio::main]
async fn main() -> Result<()> {
  let resend = Resend::new("re_xxxxxxxxx");

  let _automation = resend
    .automations
    .list_runs(
      "c9b16d4f-ba6c-4e2e-b044-6bf4404e57fd",
      None,
      ListOptions::default(),
    )
    .await?;

  Ok(())
}
import com.resend.*;

public class Main {
    public static void main(String[] args) {
        Resend resend = new Resend("re_xxxxxxxxx");

        ListAutomationRunsResponseSuccess data = resend.automations().listRuns("c9b16d4f-ba6c-4e2e-b044-6bf4404e57fd");
    }
}
using Resend;

IResend resend = ResendClient.Create( "re_xxxxxxxxx" );

var resp = await resend.AutomationRunListAsync( new Guid( "c9b16d4f-ba6c-4e2e-b044-6bf4404e57fd" ) );
Console.WriteLine( "Count={0}", resp.Content.Data.Count );
curl -X GET 'https://api.resend.com/automations/c9b16d4f-ba6c-4e2e-b044-6bf4404e57fd/runs' \
     -H 'Authorization: Bearer re_xxxxxxxxx'
resend automations runs list c9b16d4f-ba6c-4e2e-b044-6bf4404e57fd
running, completed, failed, cancelled).See the Runs documentation and List Runs API reference for more details.